OpenNMS is a free an open source enterprise grade network monitoring and network management platform.
Here at Ibmi Media, as part of our Server Management Services, we regularly help our Customers to perform CentOS related installations.
In this context, we shall look into steps to install OpenNMS.
More Information about OpenNMS?
OpenNMS is a free & open-source network Monitoring and network management platform. It is mainly built using Java.
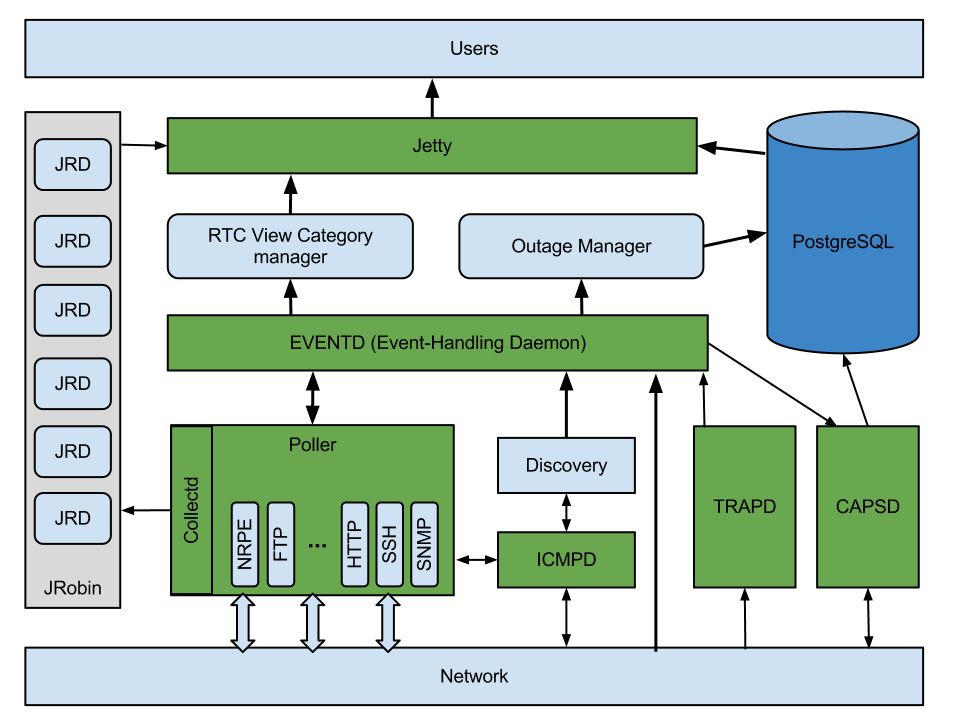
The traditional network management products focus on network elements such as interfaces on switches and routers. Whereas the OpenNMS focuses on the services network resources provide web pages, database access, DNS, DHCP, etc.
Moreover, it has better features that include scalability, extensibility, open Source, and good support that is provided by The OpenNMS Group.
Steps to install OpenNMS in CentOS ?
The following process should be taken to install OpenNMS:
1. Update and prepare the server
As a first step, we update and install the essential tools. Here is the command for it.
$ sudo dnf -y update
$ sudo dnf install -y vim curl wget
Since OpenNMS is developed using Java, so we need to install Java. OpenJDK is a free and open-source implementation of the Java Platform. So here is the command that we use to install Java.
$ sudo yum install java-11-openjdk-devel
$ java -version
openjdk 11-ea 2018-09-25
OpenJDK Runtime Environment (build 11-ea+28)
OpenJDK 64-Bit Server VM (build 11-ea+28, mixed mode, sharing)
$ which java
/usr/bin/java
Next, we set Java environment variables
cat > /etc/profile.d/java11.sh <<EOF
export JAVA_HOME=\$(dirname \$(dirname \$(readlink \$(readlink \$(which javac)))))
export PATH=\$PATH:\$JAVA_HOME/bin
export CLASSPATH=.:\$JAVA_HOME/jre/lib:\$JAVA_HOME/lib:\$JAVA_HOME/lib/tools.jar
EOF
Now, source the file to start using it without logging out.
$ source /etc/profile.d/java11.sh
2. OpenNMS Horizon Installation
Once, we’ve completed the base layer installation, we can now move to install the OpenNMS Horizon.
First, add the yum repository and import the GPG key:
$ sudo dnf -y install https://yum.opennms.org/repofiles/opennms-repo-stable-rhel8.noarch.rpm
$ sudo rpm –import https://yum.opennms.org/OPENNMS-GPG-KEY
After adding the repository, install OpenNMS with all of its built-in dependencies.
$ sudo dnf -y install opennms
3. Initialize and setup PostgreSQL
The PostgreSQL must be installed automatically in the previous command. So now we configure it with relevant databases, credentials and also make sure it is running properly.
1. First, we initialize the PostgreSQL database.
sudo postgresql-setup --initdb --unit postgresql2. Then we enable and start it by running the command.
sudo systemctl enable postgresql
sudo systemctl start postgresql
3. In order to access the OpenNMS database, we create a user with a password.
$ sudo su postgres
bash-4.4$ psql
psql (10.14)
Type "help" for help.
postgres=# createuser -P opennms
postgres-# createdb -O opennms opennms
postgres-# \q
bash-4.4$ exit
Also, we protect the default postgres user with a password to add security as shown below:
$ sudo su postgres
bash-4.4$ psql
postgres=# ALTER USER postgres WITH PASSWORD 'StrongPassword';
ALTER ROLE
postgres=# \q
bash-4.4$ exit
4. Now, we change the access policy for PostgreSQL
After installing Postgres, ident is the default method for local IPv6 and IPv4 connections. Now we are going to change that from ident to MD5-hashed way. Edit the file shown below accordingly.
sudo vim /var/lib/pgsql/data/pg_hba.confThen allow OpenNMS Horizon to access the database over the local network with an MD5 hashed password.
After making the changes, restart postgres to apply and persist configuration changes for PostgreSQL by running the below command.
sudo systemctl restart postgresql5. Configure database access to OpenNMS Horizon
Once, we complete configuring the database, we should now allow OpenNMS Horizon to freely connect. Make changes on the opennms-datasources.xml file as shown below.
$ sudo vim /opt/opennms/etc/opennms-datasources.xml
<jdbc-data-source name="opennms"
database-name="opennms"
class-name="org.postgresql.Driver"
url="jdbc:postgresql://localhost:5432/opennms"
user-name="opennms"
password="opennms" />
<jdbc-data-source name="opennms-admin"
database-name="template1"
class-name="org.postgresql.Driver"
url="jdbc:postgresql://localhost:5432/template1"
user-name="postgres"
password="StrongPassword" />
4. Initialize and start OpenNMS Horizon
After updating the database settings, now let’s initialize the OpenNMS Horizon.
Detect of Java environment and persist in /opt/opennms/etc/java.conf
sudo /opt/opennms/bin/runjava -sNow, initialize the database and detect system libraries persisted in /opt/opennms/etc/libraries.properties
sudo /opt/opennms/bin/install -disFinally, enable OpenNMS Horizon so that it starts automatically on system boot.
$ sudo systemctl enable --now opennms
$ sudo systemctl status opennms
Allow the traffic from 8980 since OpenNMS Horizon listens on that port.
sudo firewall-cmd --permanent --add-port=8980/tcp
sudo firewall-cmd --reload
5. Login and change the default password
Once you start the OpenNMS, you can access the web application by pointing your browser to http://[IP-or-FQDN-of-your-server]:8980/opennms. By default, the login user is admin and the password is initialized to admin as shown below.
After logging in, change the password by clicking the main navigation menu on >> "admin >> Change Password >> Change Password". Finally, click submit after changing the password.
6. Add Hosts in OpenNMS
The last step is to add a host so that we can monitor.
i. Log into your OpenNMS web console
ii. On the main navigation menu, click "+".
iii. A pop-up appears to enter the ‘requisition’, enter it.
iv. Fill the form and click ‘Provision’ at the bottom of the page.
v. Finally, a pop-up with a success message should appear.
[Need urgent assistance with CentOS queries? – We are here to help you. ]
Conclusion
This article will guide via a step-by-step procedure to #install OpenNMS in #CentOS.
OpenNMS is a free, Open Source network monitoring system that can be used to #monitor tens of thousands of unlimited devices with a single #instance.
It will discover and monitor the services or nodes automatically in your #network, or you can assign a particular service to monitor by OpenNMS.
To configure #OpenNMS:
1. Install OpenNMS Horizon. Add yum repository and import GPG key.
2. Initialize and set up #PostgreSQL. Initialization of the PostgreSQL database will start.
3. Initialize and start OpenNMS Horizon.
4. First Login and change default password.


