Are you trying to deploy Virtual Machines in RHEV Environment ?
This guide is for you.
A virtual machine (VM) is a virtual environment that functions as a virtual computer system with its own CPU, memory, network interface, and storage, created on a physical hardware system (located off- or on-premises).
Here at Ibmi Media, as part of our Server Management Services, we regularly help our Customers to deploy virtual machines into an RHEV environment.
In this context, we shall look into how to deploy virtual machines.
More about Virtual Machines Deployment in RHEV Environment ?
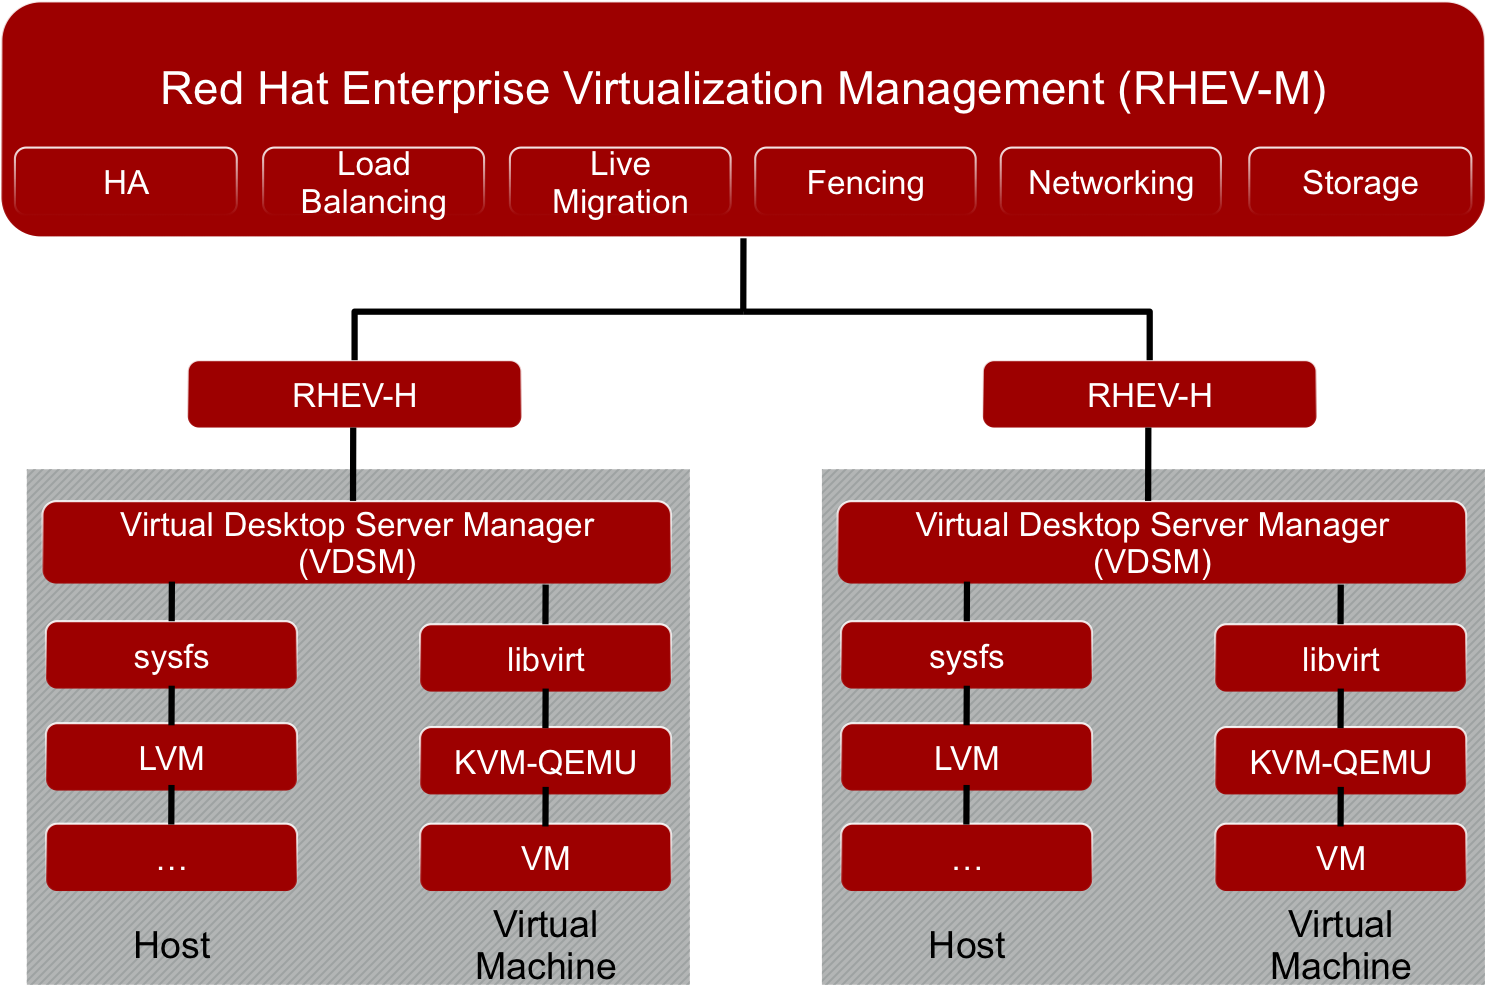
Red Hat Enterprise Virtualization is a compact and full-featured virtualization platform built on Red Hat Enterprise Linux (RHEL).
It is easy to manage, provision, upgrade RHEV. Also it is managed through a WebUI thus making it easy to access from any platform.
When several virtual machines are running on the same host, performance may be hindered if the computer it's running on lacks sufficient power. Your virtual machine still uses the resources of your host machine. A regular computer devoid of virtual machines would then only be affected.
How to Deploy Virtual Machines in RHEV Environment ?
We will be deploying VMs in an RHEV environment using ISO file/image, the environment will have a Data Centre attached to ISCSI shared storage.
RHEV entertainment has a special domain used only to store ISO files which are used to create virtual machines, it is known as ISO Domain.
The steps to implement the deployment is given below:
1. Creating and Deploying New ISO Domain
We will create a new ISO domain first to Deploy Virtual Machines in RHEV Environment. We can also use the existing one if we wish to.
The newly created one will use NFS shared storage on our storage node IP:11.0.0.7.
Steps to follow are given below:
i. To Deploy NFS service on our storage node, execute the following commands:
# yum install nfs-utils -y
# chkconfig nfs on
# service rpcbind start
# service nfs start
ii. Using NFS we will create a new directory to be shared.
# mkdir /ISO_Domainiii. Then add the following line to the /etc/exports file and apply changes.
/ISO_Domain 11.0.0.0/24(rw)
# exportfs -a
iv. Next we will change the ownership of the directory to be with uid:36 and gid:36.
# chown 36:36 /ISO_Domain/This allows RHEVM to access the exported directory.
v. Now to create New ISO domain with NFS type, we have to take ‘Data-Center1’ from the System tab and click on New Domain from the storage tab.
vi. Then fill the window as given below:
Name: ISO_Domain
Use Host: rhevhn1.mydomain.org
Export Path: 11.0.0.7:/ISO_Domain
vii. Next, we will upload some ISO files/images. For this, we have to ensure that we have the ISO file on the RHEVM server. Here we will work with two ISO's one for Linux and the other one for Windows.
viii. We will use rhevm-iso-uploader for uploading ISO to ISO Domains. The uploading process takes some time as it depends on the network speed.
ix. Then we will check the uploaded ISO’s from the web interface.
[Need urgent assistance to create a new ISO Domain? We are happy to help you! ]
2. Linux Virtual Machines Deployment in RHEV Environment
First, you will see the steps to create a Linux-server virtual machine in the RHEV environment:
i. First, take the Virtual Machines tab and click ‘New VM’.
ii. Then fill the window that appears with the necessary fields and click ‘Show Advanced Options’.
iii. And select 'System' to modify Memory and vCPU’s.
iv. Then select Boot Options to attach the ISO image to VMs, and press OK.
v. Before starting the virtual machine, we must create and attach the virtual disk. So, press "Configure Virtual Disks".
vi. Then fill the next window that appears, with the following details and click OK:
Size(GB): 10
Alias: Linux_Server_VM_Disk1
Interface: VirtIO
Allocation Policy: Thin Provision
Storage Domain: ISCSI-Node1 (45 GB free of 49 GB)
Disk Profile: ISCSI-Node1
vii. Close the window that prompts to add another virtual disk.
We can install the SPICE plug-in to make sure the virtual machine console works fine.
For Redhat/CentOS
# yum install spice-xpiFor Debian/Ubuntu
# apt-get install browser-plugin-spiceAfter that restart the Firefox browser.
viii. Now, we will run the virtual machine from "Run once".
Run once is used to modify VM setting just for one time (Not Permanent) for testing or installation.
ix. Finally, click OK and then open VM's console.
3. Windows Virtual Machines Deployment in RHEV Environment
Next, we will see the steps to create a Windows-server virtual machine in the RHEV environment.
Here we will be deploying another virtual machine that acts as a desktop machine (Windows7).
Steps to follow are given below:
i. First, we need to create a new VM and a new disk as mentioned above while creating the Linux VM.
ii. Then we will add some special paravirtualization drivers and tools under the follwing:
/usr/share/virtio-win/
/usr/share/rhev-guest-tools-iso/
We will upload the ISO files to our ISO Domain and confirm it from the web interface.
/usr/share/rhev-guest-tools-iso/RHEV-toolsSetup_3.5_9.iso
/usr/share/virtio-win/virtio-win_amd64.vfd
iii. Click Run once and attach the virtual floppy disk to open the VM console.
iv. We must follow the instructions and complete the installation. At the disk partitioning stage, we will not see any disks.
v. So click on 'Load Driver' then 'Browse' and locate the path of drivers on the virtual floppy disk. Select the two drivers related to Ethernet and SCSI controller.
vi. Then click Next and wait to see the disk.
We can follow the steps sequentially until we see 'Finished Successfully' to complete the installation and then reboot the system.
[Facing difficulty for deploying Windows VMs? We can help you!]
Conclusion
This article will guide you on how to #deploy #virtual #machines in the #RHEV environment and also on #Linux and #Windows virtual machines.
A Virtual Machine (#VM) is a compute resource that uses software instead of a physical computer to run programs and deploy apps. One or more virtual "guest" #machines run on a physical "host" machine.
The main purpose of VMs is to operate multiple operating systems at the same time, from the same piece of hardware. Without virtualization, operating multiple systems — like Windows and Linux — would require two separate physical units.
The two basic types of virtual machines are process and system VMs:
1. A process virtual machine allows you to run a single process as an application on a host machine.
2. A system virtual machine is a fully virtualized #VM designed to be a substitute for a physical machine.
Your virtual machine internet connection goes through your computer and through your router. So they can track your router's #IP address, and possibly track you down at least to your city, if not to individual street or house.


