Need to know the use of FastCGI Proxying in Nginx?
This guide will help you.
FastCGI is a binary protocol for interfacing interactive programs with a web server.
FastCGI's main aim is to reduce the overhead related to interfacing between web server and CGI programs, allowing a server to handle more web page requests per unit of time.
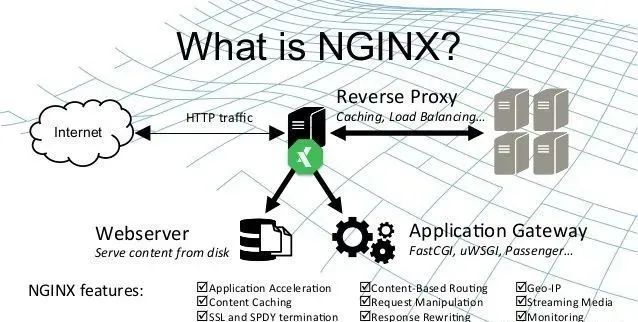
Nginx is one of the most flexible and powerful web servers available. In terms of design, it is very performant to handle requests with other servers.
Nginx can proxy requests using HTTP, FastCGI, uwsgi, SCGI, or Memcached.
Here at Ibmi Media, as part of our Server Management Services, we regularly help our Customers to perform Nginx related queries.
In this context, we shall look into the use of FastCGI Proxying in Nginx.
Importance of using FastCGI Proxying in Nginx?
Generally, we use FastCGI proxying within Nginx to translate client requests for an application server that does not or should not handle client requests directly.
FastCGI is a protocol to improve performance by not running each request as a separate process.
One of the main use-cases of FastCGI proxying within Nginx is PHP processing. Most often, this is handled with PHP-FPM, a PHP processor that has been extensively tested to work with Nginx.
We can use Nginx with FastCGI with applications using other languages so long as there is an accessible component configured to respond to FastCGI requests.
FastCGI Proxying Basics
In general, proxying requests involve the proxy server. Here, Nginx forwarding requests from clients to a backend server.
The directive that Nginx uses to define the actual server to proxy using the FastCGI protocol is fastcgi_pass.
For example, a basic location block may look like this:
# server context
location ~ \.php$ {
fastcgi_pass 127.0.0.1:9000;
}
. . .
When a proxy connection is made, the original request translates to ensure that the proxy request makes sense to the backend server.
The primary method of passing extra information using the FastCGI protocol is with parameters.
Nginx can set FastCGI parameters using the fastcgi_param directive.
The bare minimum configuration that will work in a FastCGI proxying scenario for PHP can be like this:
# server context
location ~ \.php$ {
fastcgi_param REQUEST_METHOD $request_method;
fastcgi_param SCRIPT_FILENAME $document_root$fastcgi_script_name;
fastcgi_pass 127.0.0.1:9000;
}
. . .
Here, we set two FastCGI parameters, REQUEST_METHOD and SCRIPT_FILENAME. The backend server requires it to understand the nature of the request.
The former tells it what type of operation it should perform, while the latter tells the upstream which file to execute.
This type of self-referential location definition is possible because we run the FastCGI processor on the same machine as our Nginx instance.
FastCGI Configuration
A key rule is to try to follow the DRY (“Don’t Repeat Yourself”) principle. This helps reduce errors, increase reusability, and allows for better organization.
A core recommendation for administering Nginx is to always set directives at their broadest applicable scope. Similarly, these fundamental goals also apply to Nginx configuration.
While dealing with FastCGI proxy configurations, most instances of use will share a large majority of the configuration.
Considering all factors, it is almost always advantageous to declare parameters in a general scope.
FastCGI Configuration Details in Parent Contexts
One way to reduce repetition is to declare the configuration details in a higher, parent context. Multiple locations can use the same config.
For instance, we can modify:
# server context
root /var/www/html;
fastcgi_param REQUEST_METHOD $request_method;
fastcgi_param SCRIPT_FILENAME $document_root$fastcgi_script_name;
fastcgi_index index.php;
location /scripts {
fastcgi_pass unix:/var/run/php5-fpm.sock;
}
location ~ \.php$ {
fastcgi_pass 127.0.0.1:9000;
}
. . .
Here, we can see both the fastcgi_param declarations and the fastcgi_index directive are available in both of the location blocks. Thus, we can remove repetitive declarations.
However, if any fastcgi_param declares in the lower context, none of the fastcgi_param values from the parent context will inherit.
The information from array directives will inherit to child contexts only if they are not present at any place in the child context. This means that if we use fastcgi_param within our location, it will effectively clear out the values inherited from the parent context completely.
For example, we can modify the above configuration slightly:
# server context
root /var/www/html;
fastcgi_param REQUEST_METHOD $request_method;
fastcgi_param SCRIPT_FILENAME $document_root$fastcgi_script_name;
fastcgi_index index.php;
location /scripts {
fastcgi_pass unix:/var/run/php5-fpm.sock;
}
location ~ \.php$ {
fastcgi_param QUERY_STRING $query_string;
fastcgi_pass 127.0.0.1:9000;
}
. . .
At first glance, we may think that the REQUEST_METHOD and SCRIPT_FILENAME parameters will inherit into the second location block.
However, what happens is that all of the parent fastcgi_param values wipeouts in the second context, and only the QUERY_STRING parameter is set.
The REQUEST_METHOD and SCRIPT_FILENAME parameters will remain unset.
How to use Include to Source FastCGI Configuration from a Separate File ?
Another way to separate out our common configuration items is to include the directive to read in the contents of a separate file to the location of the directive declaration.
Initially, we set our common FastCGI configuration values.
We will call this file fastcgi_common:
fastcgi_param REQUEST_METHOD $request_method;
fastcgi_param SCRIPT_FILENAME $document_root$fastcgi_script_name;
Now, we can read in this file wherever we wish to use those configuration values:
# server context
root /var/www/html;
location /scripts {
include fastcgi_common;
fastcgi_index index.php;
fastcgi_pass unix:/var/run/php5-fpm.sock;
}
location ~ \.php$ {
include fastcgi_common;
fastcgi_param QUERY_STRING $query_string;
fastcgi_param CONTENT_TYPE $content_type;
fastcgi_param CONTENT_LENGTH $content_length;
fastcgi_index index.php;
fastcgi_pass 127.0.0.1:9000;
}
. . .
Here, we move some common fastcgi_param values to the file, fastcgi_common in our default Nginx configuration directory.
We then source that file when we want to insert the values declared within.
How to use the fastcgi_params File or the fastcgi.conf File ?
A sane set of common parameters to include in our FastCGI pass locations are, fastcgi_params or fastcgi.conf.
The fastcgi_params file does not contain a declaration for the SCRIPT_FILENAME parameter, while the fastcgi.conf file does.
In order to avoid breaking configurations that rely on fastcgi_params, to provide a default value for SCRIPT_FILENAME, we should create a new file.
Failure of which may result in that parameter being set in both the common file and FastCGI pass location.
If we have both of these files available, for most FastCGI pass locations, it is probably better to include the fastcgi.conf file, as it includes a declaration for the SCRIPT_FILENAME parameter.
We can include them by referencing their location relative to the root Nginx configuration directory:
# server context
location ~ \.php$ {
include fastcgi_params;
# You would use “fastcgi_param SCRIPT_FILENAME . . .” here afterwards
. . .
}
Or like this:
# server context
location ~ \.php$ {
include fastcgi.conf;
. . .
}
The need to Check Requests Before Passing to FastCGI ?
Passing all requests to the backend application, regardless of their validity, is not only inefficient but also dangerous.
In order to address this issue, we should make sure to send only legitimate requests to our FastCGI processors.
One basic rule is that we should never allow any processing and interpretation of user files in our configuration.
It is relatively easy for malicious users to embed valid code within seemingly innocent files, such as images. Once such a file is in our server, ensure that it never makes its way to the FastCGI processor.
Similarly, consider a request for /test.jpg/index.php. If our configuration simply passes every request ending in .php to our processor without testing its legitimacy, the processor, if following the spec, will check for that location and execute it if possible.
If it does not, it will then follow the spec and attempt to execute the /test.jpg file, marking /index.php as the additional path information for the script. This could allow for some very undesirable consequences when combined with the idea of user uploads.
There are a number of different ways to resolve this issue. The easiest is to simply turn it off in our processor. For PHP-FPM, we can turn this off in our php.ini file.
For example, on Ubuntu systems, we could edit this file:
$ sudo nano /etc/php5/fpm/php.iniSimply search for the cgi.fix_pathinfo option, uncomment it and set it to “0” to disable this “feature”:
cgi.fix_pathinfo=0Restart the PHP-FPM process to make the change:
$ sudo service php5-fpm restartThis will cause PHP to only ever attempt execution on the last component of a path.
Another option is to check the existence of the files on disk before passing them to the processor.
If the /test.jgp/index.php file does not exist, error out.
However, if it does, then send it to the backend for processing:
location ~ \.php$ {
try_files $uri =404;
. . .
}
If our application does rely on the path info behavior for a correct interpretation, we can still safely allow this behavior by doing checks before deciding whether to send the request to the backend.
For instance, if our application’s uploads directory is /uploads/, we could create a location block that matches before any regular expressions evaluate:
location ^~ /uploads {
}
Inside, we can disable any kind of processing for PHP files:
location ^~ /uploads {
location ~* \.php$ { return 403; }
}
The parent location will match for any request starting with /uploads and any request dealing with PHP files will return a 403 error.
In addition, we can set up a location block that considers the first instance of a path component ending in .php as the script to run. The rest will be the extra path info.
The location may look something like this:
location ~ [^/]\.php(/|$) {
fastcgi_split_path_info ^(.+?\.php)(.*)$;
set $orig_path $fastcgi_path_info;
try_files $fastcgi_script_name =404;
fastcgi_pass unix:/var/run/php5-fpm.sock;
fastcgi_index index.php;
include fastcgi_params;
fastcgi_param SCRIPT_FILENAME $request_filename;
fastcgi_param PATH_INFO $orig_path;
fastcgi_param PATH_TRANSLATED $document_root$orig_path;
}
We use the set directive to store the value held in $fastcgi_path_info at this point into the variable, $orig_path. This is because the $fastcgi_path_info variable will wipe out in a moment by our try_files directive.
We test for the script name using try_files. However, this has a side-effect of clearing the $fastcgi_path_info variable.
After doing the conventional FastCGI pass, we set the SCRIPT_FILENAME as usual. We also set the PATH_INFO to the value we offloaded into the $orig_path variable.
Although our $fastcgi_path_info was cleared, its original value is retained in this variable. Then we set the PATH_TRANSLATED parameter to map the extra path info to the location where it exists on the disk.
We do this by combining the $document_root variable with the $orig_path variable.
This allows us to construct requests like /index.php/users/view so that our /index.php file can process information about the /users/view directory while avoiding situations where /test.jpg/index.php will be run.
We could even make this work with an alias directive. We have to account for this in both our location header and the fastcgi_split_path_info definition:
location ~ /test/.+[^/]\.php(/|$) {
alias /var/www/html;
fastcgi_split_path_info ^/test(.+?\.php)(.*)$;
set $orig_path $fastcgi_path_info;
try_files $fastcgi_script_name =404;
fastcgi_pass unix:/var/run/php5-fpm.sock;
fastcgi_index index.php;
include fastcgi_params;
fastcgi_param SCRIPT_FILENAME $request_filename;
fastcgi_param PATH_INFO $orig_path;
fastcgi_param PATH_TRANSLATED $document_root$orig_path;
}
Make sure to change the cgi.fix_pathinfo option in our php.ini file to “1” to make this work correctly.
In addition, we turn off the security.limit_extensions in our php-fpm.conf file:
504 Gateway Timeout error on Nginx + FastCGI (php-fpm)For Nginx + FastCGI (php-fpm), we should try to tweak the Nginx configuration.
Eventually, we try to raise the max_execution_time setting in the php.ini file (CentOS path is /etc/php.ini):
max_execution_time = 300But, we should also change the set request_terminate_timeout parameter at www.conffile from PHP-FPM:
pico -w /etc/php-fpm.d/www.confThen set the variable to the same value as max_execution_time:
request_terminate_timeout = 300Now we add the fastcgi_read_timeout variable inside our Nginx virtual host configuration:
location ~ .php$ {
root /var/www/sites/nginxtips.com;
try_files $uri =404;
fastcgi_pass unix:/tmp/php5-fpm.sock;
fastcgi_index index.php;
fastcgi_param SCRIPT_FILENAME $document_root$fastcgi_script_name;
include fastcgi_params;
fastcgi_read_timeout 300;
}
Finally, restart Nginx:
$ service nginx reload[Need urgent help with FastCGI Proxying in Nginx procedures? We'd be happy to assist. ]
Conclusion
This article covers FastCGI Proxying in Nginx. Basically, FastCGI Proxying in Nginx allows working with a great number of applications, in configurations that are performant and secure.
FastCGI proxying within Nginx is generally used to translate client requests for an application server that does not or should not handle client requests directly.
Nginx has become one of the most flexible and powerful web server solutions available.
However, in terms of design, it is first and foremost a proxy server.
This focus means that Nginx is very performant when working to handle requests with other servers.
Nginx can proxy requests using http, FastCGI, uwsgi, SCGI, or memcached.
How do I know if #FastCGI is enabled?
If the variable is present and correctly set to /phpinfo. php/foobar? foo=bar, then either ISAPI or FastCGI is used.
Look near the top of the output for Server API; it should be set to either ISAPI (which means ISAPI is being used) or CGI/FastCGI (which means FastCGI is being used, since we already ruled out CGI).
More about Fastcgi_read_timeout?
proxy_read_timeout is applied when nginx proxies via HTTP protocol (for example, if you used nginx to proxy the request to a server such as node.js ). fastcgi_read_timeout is used when nginx speaks to the other service using FastCGI protocol.
More about Keepalive_timeout in nginx?
The keepalive_timeout assigns the timeout for keep-alive connections with the client.
Simply put, Nginx will close connections with the client after this period of time.
How does Nginx location work?
The location directive within NGINX server block allows to route request to correct location within the file system.
The directive is used to tell NGINX where to look for a resource by including files and folders while matching a location block against an URL.
How do I start Nginx on Linux?
1. Nginx is a powerful server application that routes network traffic.
2. Nginx runs as a service on your server.
3. systemctl can be used to start and stop the Nginx service.
4. To force close and restart Nginx and related processes: sudo /etc/init.d/nginx restart.
What does #Nginx Rewrite do?
Nginx rewrite rules can be defined within your Nginx configuration file in order to change at least part or all of a URL.
Usually, this is done for one of two purposes.
First, if a URL has changed, using a rewrite rule will let the client know that the resource requested is in a different location.
How do I remove nginx welcome page?
If you removed default under /etc/nginx/sites-available and restarted nginx and the welcome page is still showing, then see if there is a default. conf under /etc/nginx/conf. d and delete it and then restart nginx.


