Are you trying to set up SELinux on CentOS 7?
This guide is for you.
SELinux, or Security-Enhanced Linux, is a part of the Linux security kernel that acts as a protective agent on servers. In the Linux kernel, SELinux relies on mandatory access controls (MAC) that restrict users to rules and policies set by the system administrator.
SELinux is basically a Linux kernel security module that brings heightened security for Linux systems.
If properly configured, SELinux can greatly reduce security risks, and help us to troubleshoot access-related error messages.
Here at Ibmi Media, as part of our Server Management Services, we regularly help our Customers to set up SElinux on CentOS 7.
In this context, we shall look into configure SElinux on CentOS.
The need to set up SELinux on CentOS 7 ?
Before going into the steps for setting up, we will see reasons to setup this on CentOS.
SELinux implements Mandatory Access Control (MAC). This is implemented on top of what is already present in every Linux distribution, the Discretionary Access Control (DAC).
To understand DAC, let us first consider how traditional Linux file security works.
In a traditional security model, we have three entities: User, Group, and Other (u,g,o).
These entities can have a combination of Read, Write, and Execute (r,w,x) permissions on a file or directory.
If a user ibmimedia creates a file in their home directory, that user will have read/write access to it, and so will the bob group.
The "other" entity will possibly have no access to it.
For checking the contents inside ibmimedia's home directory we can use the following command:
# ls -l /home/ibmimedia/We can see an output like the following:
total 4
-rwxrw-r--. 1 bob bob 41 Aug 6 22:45 myscript.sh
Now ibmimedia can change this access. ibmimedia can grant (and restrict) access to this file to other users and groups or change the owner of the file.
However, with SELinux, we can define what a user or process can do.
It keeps every process bound to its own domain so the process can interact with only certain types of files and other processes from allowed domains.
This prevents a hacker from hijacking any process to gain system-wide access.
Steps to follow for setting up SELinux on CentOS 7 ?
We will use a test server for this setup that runs both a web and an SFTP server.
We will start with a bare installation of CentOS 7 with minimal packages installed and install the Apache and vsftp daemons on that server.
However, we will not configure either of these applications.
To begin, we will create a few test user accounts in our cloud server.
Finally, we will install the needed SELinux-related packages.
This is done to ensure that we can work with the latest SELinux commands without facing any issues.
1. Installing Apache and SFTP Services
First, log in to the server as the root user and run the following command to install Apache:
# yum install httpdAnd then start the daemon manually using the following command:
# service httpd startNext, we will install vsftp:
# yum install vsftpd
2. Installing SELinux Packages
SELinux uses a number of packages. Some are installed by default. Here is a list of Red Hat-based distributions:
i. policycoreutils
ii. policycoreutils-python
iii. selinux-policy
iv. selinux-policy-targeted
v. libselinux-utils
vi. setroubleshoot-server
vii. setools
viii. setools-console
ix. mcstrans
To check what SELinux packages are installed on the CentOS 7 system, we can run the following commands:
# rpm -qa | grep selinuxIf we cant to install all the packages, we can use the following command along with the package name:
# yum install package_name 3. SELinux Modes
At a time, SELinux can be in any of the following three possible modes:
i. Enforcing
ii. Permissive
iii. Disabled
In enforcing mode SELinux will enforce its policy on the Linux system and ensure to deny all unauthorized access attempts by users and processes.
Moreover, these access denials are written to relevant log files.
Permissive mode is like a semi-enabled state. SELinux does not apply its policy in permissive mode, so it will not deny any access.
However, any policy violation is still logged in the audit logs. It is a great way to test SELinux before enforcing it.
In the disabled mode, the system will not be running with enhanced security.
4. Checking SELinux Modes and Status
We can run the following getenforce command to check the current SELinux mode:
# getenforceWe can also run the sestatus command:
# sestatus5. SELinux Configuration File
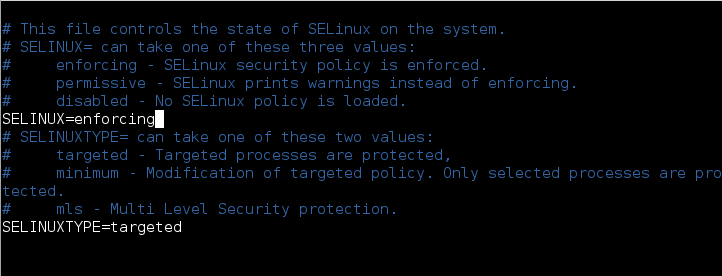
The main configuration file for SELinux is /etc/selinux/config.
We use the following command to view its contents:
# cat /etc/selinux/configThe output will look as given below:
# This file controls the state of SELinux on the system.
# SELINUX= can take one of these three values:
# enforcing - SELinux security policy is enforced.
# permissive - SELinux prints warnings instead of enforcing.
# disabled - No SELinux policy is loaded.
SELINUX=disabled
# SELINUXTYPE= can take one of these two values:
# targeted - Targeted processes are protected,
# minimum - Modification of targeted policy. Only selected processes are protected.
# mls - Multi Level Security protection.
SELINUXTYPE=targeted
6. Enabling and Disabling SELinux
Enabling SELinux is fairly simple, however disabling it should be done in a two-step process. We will assume that SELinux is currently disabled.
Firstly, we need to edit the /etc/selinux/config file to change the SELINUX directive to permissive mode.
# vi /etc/sysconfig/selinux
...
SELINUX=permissive
...
Next, we will reboot the system using the following command:
# rebootAfter that log in to the server again as root and search for the string “SELinux is preventing” from the contents of the /var/log/messages file.
We can use the following command:
# cat /var/log/messages | grep "SELinux is preventing"If there are no errors, we can safely move to the next step.
However, we can at once search for text containing “SELinux” in /var/log/messages file.
We can use the following command:
# cat /var/log/messages | grep "SELinux"If we receive any errors of the following kind, we can safely ignore them.
- Aug 20 11:31:14 localhost kernel: SELinux: Initializing.
- Aug 20 11:31:16 localhost kernel: SELinux: Disabled at runtime.
- Aug 20 11:31:21 localhost journal: Unable to lookup SELinux process context: Invalid argument
- Aug 20 11:33:20 localhost gnome-session: SELinux Troubleshooter: Applet requires SELinux be enabled to run.
- Aug 20 11:37:15 localhost kernel: SELinux: Initializing.
- Aug 20 11:37:17 localhost kernel: SELinux: Disabled at runtime.
- Aug 20 11:37:23 localhost journal: Unable to lookup SELinux process context: Invalid argument
- Aug 20 11:37:44 localhost gnome-session: SELinux Troubleshooter: Applet requires SELinux be enabled to run.
- Aug 20 11:39:42 localhost kernel: SELinux: Initializing.
- Aug 20 11:39:44 localhost kernel: SELinux: Disabled at runtime.
- Aug 20 11:39:50 localhost journal: Unable to lookup SELinux process context: Invalid argument
This was happening when SELInux was either disabled or in permissive mode.
In the second phase, we need to edit the config file to change the SELINUX directive from permissive to enforcing in the /etc/sysconfig/selinux file:
# vi /etc/sysconfig/selinux
...
SELINUX=enforcing
...
Next, reboot the server again using the following command:
# rebootOnce the server is back online, we can run the sestatus command to check the SELinux status.
It should now show more details about the server:
# sestatus
SELinux status: enabled
SELinuxfs mount: /sys/fs/selinux
SELinux root directory: /etc/selinux
Loaded policy name: targeted
Current mode: permissive
Mode from config file: error (Success)
Policy MLS status: enabled
Policy deny_unknown status: allowed
Max kernel policy version: 28
After that check the /var/log/messages file using the following command:
# cat /var/log/messages | grep "SELinux"There should be no errors. And the output will look like the following:
Aug 20 11:42:06 localhost kernel: SELinux: Initializing.
Aug 20 11:42:09 localhost systemd[1]: Successfully loaded SELinux policy in 183.302ms.
Aug 20 11:44:25 localhost kernel: SELinux: Initializing.
Aug 20 11:44:28 localhost systemd[1]: Successfully loaded SELinux policy in 169.039ms.
7. Checking SELinux Modes and Status (Again)
We can run the following getenforce command to check the current SELinux mode.
# getenforceIf our system is running in enforcing mode the output will look like this:
EnforcingThe output will be different if SELinux is disabled:
DisabledWe can also run the following sestatus command to get a better picture.
# sestatusIf SELinux is not disabled, the output will show its current status, its current mode, the mode defined in the configuration file, and the policy type.
SELinux status: enabled
SELinuxfs mount: /sys/fs/selinux
SELinux root directory: /etc/selinux
Loaded policy name: targeted
Current mode: enforcing
Mode from config file: enforcing
Policy MLS status: enabled
Policy deny_unknown status: allowed
Max kernel policy version: 28
When SELinux is disabled, the output will show:
SELinux status: disabledWe can also temporarily switch between enforcing and permissive modes using the setenforce command.
Keeping in mind that we cannot run setenforce when SELinux is disabled.
First, we will change the SELinux mode from enforcing to permissive in our CentOS 7 system using the following:
# setenforce permissiveRunning the sestatus command now shows the current mode is different from the mode defined in config file:
SELinux status: enabled
SELinuxfs mount: /sys/fs/selinux
SELinux root directory: /etc/selinux
Loaded policy name: targeted
Current mode: permissive
Mode from config file: enforcing
Policy MLS status: enabled
Policy deny_unknown status: allowed
Max kernel policy version: 28
For switching back to enforcing we can use the following command:
# setenforce enforcing[Need urgent assistance to set up SELinux on CentOS System ? – We are available 24*7. ]
Conclusion
This article covers how to set up SELinux on #CentOS 7. #SELinux is a security mechanism built into the Linux kernel. Linux distributions such as CentOS, RHEL, and Fedora are equipped with SELinux by default.
SELinux improves server security by restricting and defining how a server processes requests and users interact with sockets, network ports, and essential directories.
To check SELinux mode:
The easiest way on how to check SELinux ( Security Enhanced Linux ) operation mode is to use getenforce command.
This command without any options or arguments will simply print a current status SELinux operational mode.
Furthermore, the current status of SELinux operational mode can be set permanently or temporarily.
To check whether SELinux is enabled or not:
1. Use the getenforce command. [vagrant@vagrantdev ~]$ getenforce Permissive.
2. Use the sestatus command.
3. Use the SELinux Configuration File i.e. cat /etc/selinux/config to view the status.
To configure SELinux to enforcing mode:
1. Open the /etc/selinux/config file in a text editor of your choice, for example: # vi /etc/selinux/config.
2. Configure the SELINUX=enforcing option: # This file controls the state of SELinux on the system.
3. Save the change, and restart the system: # reboot.
To enable SELinux without rebooting:
1. Changing the SELinux mode at run time. If SELinux is disabled it cannot be enabled without rebooting.
2. To detemine the current Mode of SELinux.
3. Changing the SELinux mode Permanently. In the /boot/grub/grub.conf file add a line: selinux=0.
4. Or in /etc/sysconfig/selinux change.
To permanently change mode to permissive:
1. Edit the /etc/selinux/config file as follows: # This file controls the state of SELinux on the system. # SELINUX= can take one of these three values: # enforcing - SELinux security policy is enforced.
2. Restart the system: $ reboot.


