Trying to add MySQL service in websitepanel?
This guide will help you.
WebsitePanel is a complete portal for Cloud Computing Companies and IT Providers to automate the provisioning of a full suite of services on Windows servers.
Sometimes, errors can occur while adding the MySQL Service. This might occur due to some compatibility issues.
Here at Ibmi Media, as part of our Server Management Services, we regularly help our Customers (website owners) to add MySQL service in websitepanel.
In this context, we shall look into the process of adding MySQL service in websitepanel and some common errors.
How to add MySQL service in websitepanel ?
Follow the instructions given below to add MySQL service in websitepanel.
1. First, we download the installation file from the below URL:
https://dev.mysql.com/downloads/windows/installer/5.7.html2. Here, we choose to skip registration and start the download.
3. Next, we run the .msi file to start the installation and click “Next” when prompted.
4. After that, we select the product to upgrade, then click “Next“.
5. Then we click “Execute” to apply the update and click “Next” to configure the product.
6. In case, if we already have a database within the server, the installer will check and update the database. Here, we enter the correct password and then press “Check“, then press “Next” once the connection is successful.
7. We then click “Execute” to apply the configuration, then “Next” to finish this part of the installation.
8. After that, we click “Next” to proceed.
9. Once the installation completes, we click “Finish” to continue.
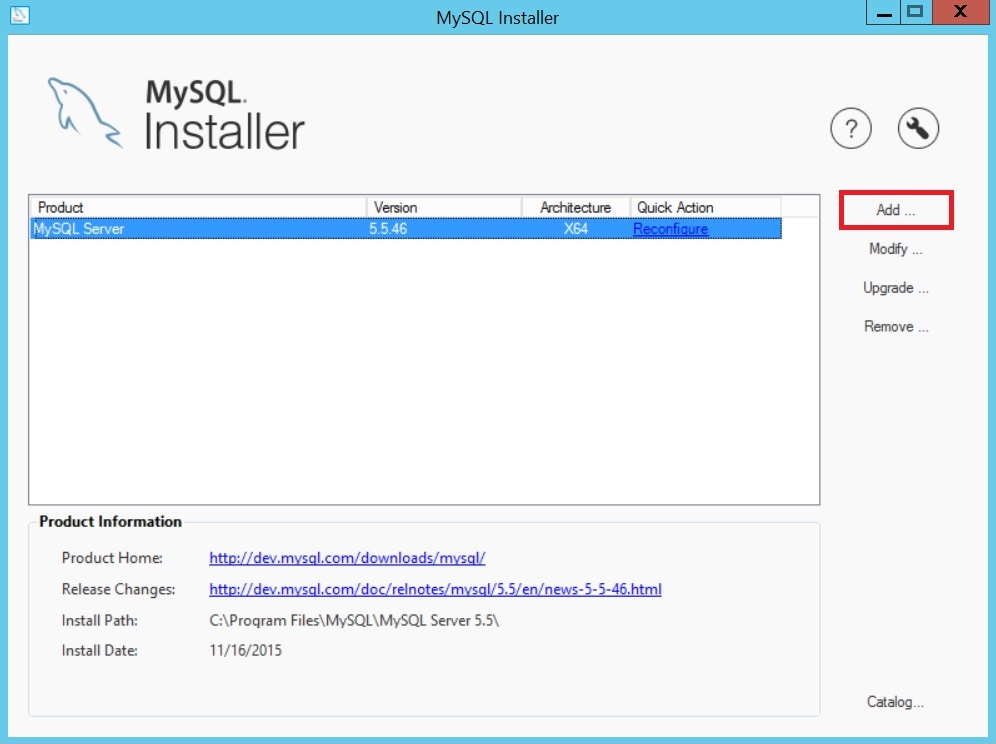
10. This shows the product we have installed. Now we can close the installer or click “Add…” to install additional products such as MySQL Server version 5.7.
11. Then we select the “CONFIGURATION” tab and click “Servers” from the drop-down list.
12. Next, we click on “My Server“. After that, we scroll down and search for the “MySQL 5” tab.
13. We click on the small “Add” beside the “MySQL 5” tab to add MySQL service to WebsitePanel.
14. From the drop-down list, we choose the version of MySQL that had been installed, then click “Add Service“.
15. A message will pop up saying that installation of MySQL Connector/Net is required, we follow the instructions and download the installer.
16. Then we run the downloaded installer but we DO NOT choose “Typical Installation“, instead we choose “Custom Installation” and remove the entire “Web Providers” section from our installation as it will give a nasty error after installation. We proceed with the installation by clicking “Next” and then “Install“.
17. Finally, we return to the MySQL Service Properties page. Here, we enter the password with the password used to login to the MySQL root account and then click “Update” at the bottom of the page. If the password entered is correct, the MySQL service will be successfully added to the list of server services.
How to resolve Common errors experienced while adding MySQL service in websitepanel ?
One of our customers approached us with the below error message:
Error while installing service on the remote serverGenerally, this error occurs while configuring MySQL service in Websitepanel. cx
This error occurs with the MySQL Net Connector 6.3.7, which might not be compatible with the WebsitePanel version. So, we need to install MySQL Net Connector 6.2.5 using the below URL:
http://dev.mysql.com/downloads/connector/net/6.2.html
1. First, we select MySQL Connector/Net version 6.2.5 and select the platform as Microsoft Windows. Next, we select the appropriate Windows platform of MSI Installer.
2. Then we download the connector.
3. After that, we select the installer as per the location.
4. Finally, we install this .msi file in our VPS and complete the configuration steps. In this way, we can install MySQL Net Connector 6.2.5, in order to avoid the configuration error in WebsitePanel of our VPS.
[Still, not able to add MySQL service in your Website hosting panel? – We'd be happy to help you. ]
Conclusion
This article covers how to add MySQL service in websitepanel.
WebsitePanel began as DotNetPanel, which its creators made only for the Windows web technology platform as a Windows hosting panel.
To add MySQL Service on WebsitePanel, follow the steps provided below:
1. Download the installation file from here. Choose to skip registration and start the download.
2. Run the .msi file to start the installation. Click “Next” when prompted.
3. Select the product to upgrade, then click “Next“.
4. Click “Execute” to apply the update.
5. Click “Next” to configure the product.
6. If you already have a database within your server, the installer will check and update your database. Type in the correct password and then press “Check“, then press “Next” when the connection is successful.
7. Click “Execute” to apply the configuration, then “Next” to finish this part of the installation.
8. Click “Next” to proceed.
9. The installation is completed, click “Finish” to continue.
10. This shows the product you have installed, you can close the installer here or click “Add…” to install additional products such as MySQL Server ver 5.7
11. Select the “CONFIGURATION” tab and click “Servers” from the drop-down list.
12. Next, click on “My Server“, scroll down and search for “MySQL 5” tab (since we have installed MySQL 5.5 by default).
13. Click on the small “Add” besides the “MySQL 5” tab to add MySQL service to WebsitePanel.
14. From the drop-down list, choose the version of MySQL that had been installed (MySQL Server 5.5 in our case), then click "Add Service".
15. You will see a message saying that installation of MySQL Connector/Net is required, follow the instructions and download the installer.
16. Run the downloaded installer but DO NOT choose “Typical Installation“, choose “Custom Installation” instead and remove the entire “Web Providers” section from your installation as it will give a nasty error after installation. Proceed with the installation by clicking “Next” and then “Install“.
17. Return to the MySQL Service Properties page, fill in the password with the password used to login to MySQL root account and then click “Update” at the bottom of the page. If the password entered is correct, the MySQL service will be successfully added to the list of server services.


