
Ispconfig vs vestacp
This article will guide you on how to choose the best control panel for customers. Basically, many factors depends to choose the right panel like Ispconfig and Vestacp.
Vesta control panel (#VestaCP) is an open source hosting control panel, which can be used to manage multiple websites, create and manage email accounts, FTP accounts, and #MySQL databases, manage DNS records and more.
To Install And Use Vesta Control Panel:
1. Install SSH Client.
2. Choose The Configuration Panel.
3. Login to Putty and VestaCP Installation.
4. Create a new user.
5. Add a new domain and database.
6. Add Cloudflare nameservers.
7. Add files to your domain via FTP.
8. Repeat the process for all your websites.
ISPConfig is a free open-source control panel application that allows website owners to easily administer their sites, similar to cPanel and Plesk.
It also allows resellers to manage multiple accounts on multiple physical or virtual servers.
ISPConfig only runs on #Linux servers.
To log into ISPConfig:
Navigate to the URL of your ISPConfig system (e.g. https://www.domain.tld:81 or http://www.domain.tld:81; replace "www. domain. tld" appropriately) with your Browser and enter your user name and your password into the form "Login". Confirm by clicking on "Login".

WHM Mail Queue Manager
This article will guide you on use different features available in the #WHM Mail Queue Manager. Basically, the #Mail #Queue Manager feature in WHM is a handy tool that allows us to view, delete, and attempt to deliver queued emails that have not yet left the server.
Postfix is a free and open-source mail transfer agent (#MTA) that routes and delivers electronic mail.
postfix flush helps to Flush queued mail.
This command will attempt to redeliver all queued mail. Use the command sparingly, multiple flushes will impact the overall performance of your mail server
To check my mail queue in cPanel:
i. Log into WHM.
ii. Go to Main >> Email >> Mail Queue Manager.
iii. You can click on the message to see the details.
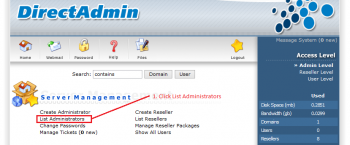
Create user in DirectAdmin
This article will guide you on how we can create a #user in DirectAdmin and fix errors related to it. DirectAdmin provides an easy way to create a user as a reseller. And the errors during its creation are mainly due to home directory unavailability or improper permissions or due to the disk being full.
#DirectAdmin can be accessed at http://server.ip.address:2222.
Use the Admin username/password from the output information provided by setup.sh (the same information is specified in the /usr/local/directadmin/scripts/setup.
To install Direct Admin:
1. Set a main #domain name. By default, no web #site is associated with your server.
2. Create nameservers (optional) Add at least one additional IP address to your sever.
3. Set your e-mail address in the control panel.

SPF record cPanel
This article will guide you on how to enable SPF record in #cPanel to reduce the chances of spoofing and thus saves the confidential information from being corrupted.
An #SPF (Sender Policy Framework) record is a type of TXT record in your #DNS zone file.
SPF allows email senders to define which #IP addresses are allowed to send mail for a particular domain.
To enable SPF record in cPanel:
1. Go to Add a record (or edit your #record if you already have one).
2. Name: enter the name of your #domain or subdomain used in your sender e-mail address.
3. TTL: enter 14400.
4. Type: select #TXT.
5. TXT Data: Enter your SPF record (e.g. v=spf1 a mx ~all)
6. Save your modifications.

More about Engintron cPanel
This article will guide you on how to #install #Engintron in #cPanel & fix relating #errors. Engintron is a third-party plugin to integrate Nginx on cPanel servers.
Engintron integrates Nginx into cPanel so you can enjoy amazing performance for your sites, without having to sacrifice important hosting features found in cPanel.
Engintron is totally free to use!
The way Engintron sets up Nginx inside your cPanel is a lot like how the popular #CloudFlare CDN works. Nginx (like CloudFlare) directly serves all static content like CSS, JS, images etc. instead of your actual web server, thus lowering the load on your cPanel server.
Engintron is the easiest way to integrate Nginx to your cPanel server:
1. Installation process is not very complicated for Engintron.
2. Also, installation and updates are very fast, they take only a few seconds.
3. Engintron is using the official repositories for Nginx, all Engintron software is updated whenever cPanel is updated. If something has changed on Engintron and you need to re-install it, you can install it on top of the previous installation. You don't need to uninstall it first like other Nginx installer plugins for cPanel. It works from CentOS 5 up to CentOS 7. Engintron has an app dashboard inside WHM.
4. The interface has basic controls for Nginx, Apache, MySQL. These controls allow you to edit various configuration files. Inside the Engintron app dashboard you’ll also find some utilities to monitor things like Nginx access & error logs, check processes on your server or see incoming traffic on port 80. It doesn’t require Nginx or Apache host synchronization when adding new domains via cPanel.
5. Also, Engintron is released under the GNU/GPL license and is 100% open source.