
Service Not Listed in WMI Wizard in Nagios - Fix it Now ?
This article covers methods to tackle Service Not Listed in WMI Wizard in Nagios. Basically, Service may not get listed in WMI Wizard in Nagios due to reasons like lower value of Truncate Output Length or insufficient permission of the user account. Windows Management Instrumentation (WMI) is a part of Windows operating systems and can provide management data and operational information about those system. WMI can be used to automate administrative tasks on remote Windows-based computers. Nagios Core and Nagios XI are capable of monitoring Windows machines via WMI. .
To Check the permissions of the files, use this command:
ls -ls /tmp/*.state
Here you can see that the root user/group is the owner of the file:
-rw-r--r-- 1 root root 91 Apr 24 16:10 /tmp/cwpss_checkcpu__1025143___.state
The simplest option is to delete the files with this command:
rm -rf /tmp/*.state

Permission denied WMI error in Nagios - Fix it Now ?
This article covers methods to fix Nagios error WMI Remote "Access Denied". Basically, Nagios supports WMI monitoring, which provides admins with a simple method of monitoring their Windows servers and workstations without having to install or configure agents.
How to fix DCOM permission ?
- Open Dcomcnfg.
- Expand Component Service -> Computers -> My computer.
- Go to the properties of My Computer.
- Select the COM Security Tab.
- Click on "Edit Limits" under Access Permissions, and ensure "Everyone" user group has "Local Access" and "Remote Access" permission.
- Click on the "Edit Limit" for the launch and activation permissions, and ensure "Everyone" user group has "Local Activation" and "Local Launch" permission.
- Highlight "DCOM Config" node, and right click "Windows Management and Instruments", and click Properties.
- <Please add the steps to check Launch and Activation Permissions, Access Permissions, Configuration Permissions based on the default of Windows Server 2008>.
How to fix Permission for the user to the WMI namespace ?
- Open WMImgmt.msc.
- Go to the Properties of WMI Control.
- Go to the Security Tab.
- Select "Root" and open "Security".
- Ensure "Authenticated Users" has "Execute Methods", "Provider Right" and "Enable Account" right; ensure Administrators has all permission.
How to Verify WMI Impersonation Rights?
- Click Start, click Run, type gpedit.msc, and then click OK.
- Under Local Computer Policy, expand Computer Configuration, and then expand Windows Settings.
- Expand Security Settings, expand Local Policies, and then click User Rights Assignment.
- Verify that the SERVICE account is specifically granted Impersonate a client after authentication rights.

Create Private Network Bridge on Proxmox VE 6 with NAT
This article covers how to create a Private Network Bridge on Proxmox.
To do this:
1. Enable paket forwarding in /etc/sysctl.conf on the Proxmox host
2. Edit /etc/network/interfaces on the ProxMox host, to get 10.10.10.0/24 for your containers, that route through eth0 of the ProxMox host
Code:
# network interface settings; autogenerated# Please do NOT modify this file directly, unless you know what
# you're doing.
#
# If you want to manage parts of the network configuration manually,
# please utilize the 'source' or 'source-directory' directives to do
# so.
# PVE will preserve these directives, but will NOT read its network
# configuration from sourced files, so do not attempt to move any of
# the PVE managed interfaces into external files!
auto lo
iface lo inet loopback
auto eth0
iface eth0 inet static
address YOUR-PUBLIC-STATIC-IP/YOUR-PUBLIC-MASK
gateway YOUR-STATIC-GATEWAY
auto vmbr1
iface vmbr1 inet static
address 10.10.10.1
netmask 255.255.255.0
bridge_ports none
bridge_stp off
bridge_fd 0
post-up iptables -t nat -A POSTROUTING -s '10.10.10.0/24' -o eth0 -j MASQUERADE
post-down iptables -t nat -D POSTROUTING -s '10.10.10.0/24' -o eth0 -j MASQUERADE
3. Configure a container inside 10.10.10.0/24 - as an example using 10.10.10.2 .

Install NRDP From Source - On different Linux Distribution
This article covers how to install NRDP from the source. NRDP is a simple, PHP-based passive result collector for use with Nagios. It is designed to be a flexible data transport mechanism and processor, with a simple and powerful architecture that allows for it to be easily extended and customized to fit individual users' needs.
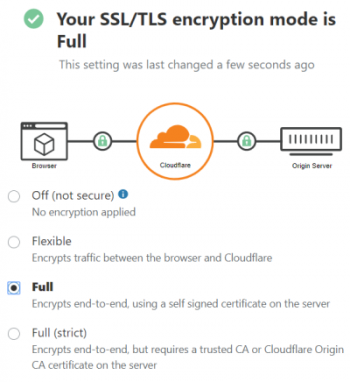
Let's Encrypt with Cloudflare - How to Configure ?
This article covers how to set up Let's Encrypt and Cloudflare Universal SSL for end-to-end encryption. Basically, Improper configuration settings while using Let's Encrypt, could cause connection errors.
Cloudflare will act as the CDN while Let's Encrypt performs the SSL (HTTPS) encryption (in lieu of Cloudflare's Universal SSL).
Let's Encrypt is great, but it's not really a comparison with Cloudflare, you can use them both. I use Lets Encrypt on my server with Cloudflare. What we suggest is that you should first get Lets Encrypt installed on your domain and make sure it works.
To add lets encrypt to Cloudflare:
1. Set up the domain.
2. Verify the Let's Encrypt certificate has been issued.
3. Sign up for Cloudflare.
4. Update nameservers and verify.

Install Nagios NCPA on Linux and Windows - Step by Step Process ?
This article covers how to Install Nagios NCPA on Linux and Windows. Basically, NCPA simplifies monitoring configurations and maintenance by allowing Nagios to monitor servers using the same agent regardless of platform. NCPA is intended to simplify and universalize agent-based monitoring
across different operating systems.
To monitor Windows Machines you will need to follow several steps and they are:
- Install NSClient++ addon on the Windows Machine.
- Configure Nagios Server for monitoring Windows Machine.
- Add new host and service definitions for Windows machine monitoring.
- Restart the Nagios Service.
Why do we need Nagios?
Here, are the important reasons to use Nagios monitoring tool:
- Detects all types of network or server issues.
- Helps you to find the root cause of the problem which allows you to get the permanent solution to the problem.
- Active monitoring of your entire infrastructure and business processes.


