Cloudflare is an excellent and well-known content delivery network. A CDN can increase site speed by utilizing Cloudflare's global caching network to deliver content closer to a visitor's location.
Let's Encrypt is an open service for creating free SSL certs for our site. Improper configuration settings while using Cloudflare with Let's Encrypt, could cause connection errors.
Here at Ibmi Media, as part of our Server Management Services, we regularly help our Customers to perform related Let's Encrypt queries.
In this context, we shall look into how to set up Cloudflare to use Let's Encrypt SSL.
How to configure Let's Encrypt with Cloudflare ?
To use Let's Encrypt in Cloudflare, Let's Encrypt should be installed on the server.
1. SSL mode in Cloudflare account
First, we will need a Cloudflare account and will need to generate a Let's Encrypt x3 cert on the server.
While selecting incorrect SSL mode in Cloudflare, it will not load and instead will display an invalid SSL cert. This is a common error and one that can be avoided to ensure that our customers have a positive and trusted experience with our site.
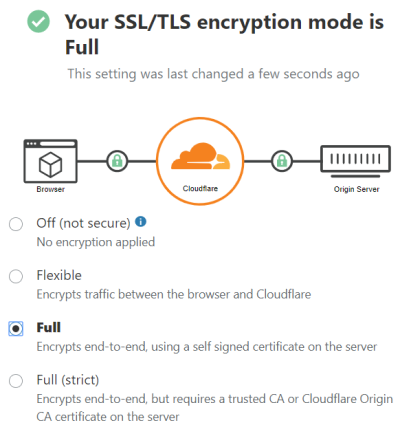
A key part is to make certain the correct SSL mode is set in Cloudflare since it offers a number of different SSL modes:
- Off
- Flexible SSL
- Full SSL (Recommended Setting)
- Full SSL (Strict)
SSL Modes can be accessed from the Crypto section in the Cloudflare dashboard. Select the domain we want to work with.
Then select "Crypto" top menu option in Cloudflare. Under SSL select – Full. Scroll down to see Always use HTTPS and set it to ON.
2. SSL settings in Cloudflare
After setting the SSL mode, we need to enable HSTS. On the HTTP Strict Transport Security (HSTS) section, select Enable HSTS.
We will need to select the "I understand" checkbox and click on the Next button.
A pop-up box will appear, where we will set the above values and click save:
Max-Age: 3 months
Apply HSTS policy to subdomains (includeSubDomains): Off
Preload: Off
Now, we need to set to Minimum TLS Version to TLS 1.2 and Opportunistic Encryption to ON. Also, set TLS 1.3 to Enabled and Automatic HTTPS Rewrites to On.
Further, Disable Universal SSL by selecting this option. As we are no longer using Cloudflare Universal SSL certificate and are using SSLs stored in our server, in this case, Let's Encrypt. Click "I understand" and select Confirm.
These simple changes made in Cloudflare will help to avoid any dreaded downtime. This means that customers can fully trust that their data is securely transferred with HTTPS through Let's Encrypt.
[Need urgent assistance with Cloudflare errors? – We're available 24*7. ]
Conclusion
This article covers how to set up Let's Encrypt and Cloudflare Universal SSL for end-to-end encryption. Basically, Improper configuration settings while using Let's Encrypt, could cause connection errors.
Cloudflare will act as the CDN while Let's Encrypt performs the SSL (HTTPS) encryption (in lieu of Cloudflare's Universal SSL).
Let's Encrypt is great, but it's not really a comparison with Cloudflare, you can use them both. I use Lets Encrypt on my server with Cloudflare. What we suggest is that you should first get Lets Encrypt installed on your domain and make sure it works.
To add lets encrypt to Cloudflare:
1. Set up the domain.
2. Verify the Let's Encrypt certificate has been issued.
3. Sign up for Cloudflare.
4. Update nameservers and verify.


