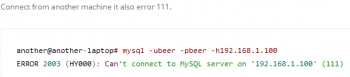
Can't connect to mysql error 111 - Fix this error now ?
This article covers methods to fix mysql error, 'Can't connect to mysql error 111' on Linux machine for our customers.
This can happen when there was a host IP change.
This issue can prevent connection to the database.
As it turned out if you do come accross this look in /etc/my.cnf, there is a line:
bind-address = ip.add.ress
This may be the old address for the server and this will stop connections, change this to your new address and restart MySQL/MariaDB and you should be good again.

Plesk Webmail Server Not Found - Fix it Now ?
This article covers methods to resolve the Plesk error "Webmail Server Not Found" which can happen while opening webmail/domain in a browser or when we issue Let's Encrypt on the domain. The main reason for this error is that the Webmail / domain does not resolve correctly in global DNS system because Plesk server is not set up to manage DNS.
To use DNS with a Plesk server:
1. DNS Server should be installed in Plesk Installer.
2. Log into Plesk and find your Name Servers in Plesk > Domains > example.com > DNS Settings, take the "value" for the record type "NS".
3. Then, it is required to change Name Server for your domain at your domain registrar's account.

503 bad sequence of commands - Fix it now ?
This article covers methods to fix the email error, "503 bad sequence of commands" which happens as a result of a number of reasons.
To resolve SMTP response: 503 Bad sequence of commands, consider the following and also read the complete guide here.
The IP that should be 10.0.0.0 - whatever that is, look at that box, this is where the problem is likely to be.
Your internal domain is domain.com or domain.net etc.
You may also add a test email account and check if it works as expected. If this works, then this could be an issue with the email account or with the service provider.
Shrink VMDK Virtual Disk Size on VMWare ESXi - Do it Now ?
This article covers how to shrink VMDK Virtual Disk Size on VMWare ESXi.
By default, VMware creates "growable" disks that grow larger in size as you add data.
Unfortunately, they don't automatically shrink when you remove data.
You'll need to clean up or compact your disks to actually free up space on your hard drive.
VMware Workstation also allows you to create snapshots, which contain a complete "snapshot" of a virtual machine's state at the point in time you created them.
These can take a lot of space if the virtual machine has changed significantly since then.
You can free up additional space by deleting snapshots you no longer need.
1. To view the snapshots for a virtual machine, select the virtual machine in VMware Workstation and click VM > Snapshot > Snapshot Manager.
2. To delete a snapshot you no longer need, right-click it in the Snapshot Manager window and select "Delete". It will be removed from your computer.
3. You won't be able to restore your virtual machine to that previous point in time after deleting the snapshot, of course.
Before we try to shrink the virtual disk files, we should try to remove any unneeded files from the virtual machine to free space.
For example, on Debian-based VMs, you can run:
$ apt-get clean
To clear out the local repository of retrieved package files.
Next, run the command below to fill the unused space with zeros:
cat /dev/zero > zero.fill;sync;sleep 1;sync;rm -f zero.fill
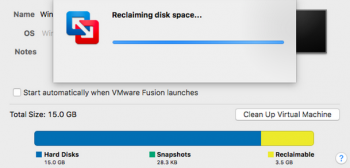
Free Disk Space In VMware Workstation
In VMware Workstation, first power off the virtual machine you want to compact. You can't complete this process if it's powered on or suspended.
1. Select the virtual machine you want to compact in the main window and click VM > Manage > Clean Up Disks.
2. The tool will analyze the selected virtual machine's disk and show you how much space you can reclaim.
To reclaim the space, click "Clean up now".
If no space can be freed, you'll see a "Cleanup is not necessary" message here instead.
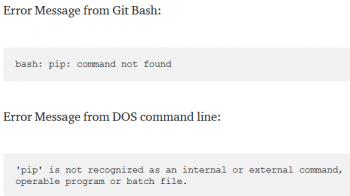
PiP is not recognized as an internal or external command - Fix it Now ?
This article covers different methods to resolve PiP is not recognized as an internal or external command.
Basically, the error, "PiP is not recognized as an internal or external command" happens when we try to install Python packages via a Command Prompt window.
PiP is a recursive acronym for "Pip Installs Packages".
It's essentially a package management system used to install and manage software packages written in Python. Most users make use of PiP to install and manage Python packages found in the Python Package Index.
To add PIP to the PATH environment variable using the Windows GUI:
1. Press Windows key + R to open up a Run dialog box. Then, type "sysdm.cpl" and press Enter to open up the System Properties screen.
2. Inside the System Properties screen, go to the Advanced tab, then click on Environment Variables.
3. In the Environment Variables screen, go to System variables and click on Path to select it. Then with the Path selected, click the Edit… button.
4. In the Edit environment variable screen, click on New and add the path where the PiP installation is located. For Python 3.4, the default location is C:\Python34\Scripts.
5. Once the path is added, open a fresh CMD window and try to install a python package that comes with PiP.
You should no longer see the "pip is not recognized as an internal or external command" error.

Undefined index notice in Joomla - Fix it now ?
This article covers how to resolve Undefined index notice in Joomla. A notice, in PHP terms (PHP is the scripting language that powers Joomla), is more or less a complaint. For example, if you're using a deprecated function such as ereg_replace (by the way, we have had quite a few sites with the ereg_replace() is deprecated notice that we needed to fix) then PHP will complain with a notice.
A notice may also be displayed if you're trying to use questionable casting that PHP thinks will not return the result that you want (for example, if you try to forcefully cast an array into a string).
To fix this Joomla warning:
Change PHP's error reporting in the .htaccess file to hide all errors.
You can do that by adding the following code to your .htaccess file:
php_flag display_startup_errors on
php_flag display_errors on
php_flag html_errors on
The above code will ensure that no error whatsoever will be displayed on your website.
Note that if you have an Error Reporting setting in your configuration settings other than "Default", then this setting will override the error reporting defined in your .htaccess.
For example, if your Error Reporting is set to "Maximum", then the above code in your .htaccess file has no effect.


