Error: "backup doesn't exist" in VestaCP - Fix it Now ?
This article covers methods to resolve Error: "backup doesn't exist" in VestaCP which generally happens while migrating a user to a new server.
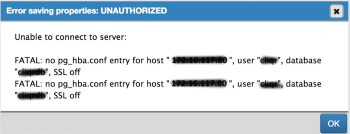
"FATAL: no pg_hba.conf entry" – How to fix the PostgreSQL error ?
This article covers methods to resolve "FATAL: no pg_hba.conf entry" error. Basically, the "no pg_hba.conf entry" can happen due to missing entries in the configuration file.
A quick way to fix this PostgreSQL server error is to do the following steps:
1. Add or edit the following line in your postgresql.conf :
listen_addresses = '*'
2. Add the following line as the first line of pg_hba.conf. It allows access to all databases for all users with an encrypted password:
# TYPE DATABASE USER CIDR-ADDRESS  METHOD
host  all  all 0.0.0.0/0 md5
3. Restart Postgresql after adding this with service postgresql restart or the equivalent command for your setup.
OnApp Boot from ISO
This article covers how to boot from ISO on Onapp. OnApp allows uploading your custom bootable ISOs for recovery purposes. These could be different images for Windows/Linux/FreeBSD or any additional software. As a cloud administrator, you can limit user's ability to upload and manage ISOs by permissions and in buckets. You can boot virtual servers from your own ISOs or the ISOs that are uploaded and made publicly available by other users.
If your cloud deployment is not a fresh installation, make sure to enable the following permissions for your Admin and other roles as appropriate:
- Any action on ISOs - the user can take any action on ISOs.
- Create a new ISO - the user can create a new ISO.
- Destroy any ISO - the user can delete any ISO (own, user, and public).
- Destroy own ISO - the user can only delete own ISO .
- Destroy user ISO - the user can delete ISOs created by any user, but not public ISOs .
- Make any ISO public - the user can make public any ISO available to all users.
- Make own ISO public - the user can make public own ISOs only.
- Make user ISO public - the user can make public ISOs created by any user .
- Create and manage own ISOs - the user can create and edit/delete/view own ISOs.
- Manage all ISOs - the user can manage own/user/public ISOs.
- Create and manage user ISOs - the user can view/create/edit/delete ISOs created by any user.
- See all ISOs - the user can view all ISOs in the cloud.
- See own ISOs - the user can only view the ISOs created by themselves.
- See all public ISOs - the user can view all public ISOs.
- See user ISOs - the user can view the ISOs created by any user in the cloud.
- Update any ISO - the user can edit any ISO in the cloud.
- Update own ISO - the user can only edit own ISO.
- Update user ISO - the user can edit the ISOs created by any user in the cloud.
By default ISOs are available only to those users who uploaded them. These ISO images are available in the My ISOs tab.
To make your ISO public and accessible for all users:
- Go to your Control Panel > Cloud > Templates > ISO List menu.
- Click My ISOs tab.
- Click the Actions button next to the ISO you want to make public, then select Make public.
- Confirm the window that pops up.
- When you make a user ISO public, it is moved to the System ISOs tab.
"psql :could not connect to server: no route to host" - Fix it Now ?
This article covers how to fix the "could not connect to server: No route to host" PostgreSQL error. Basically, the "could not connect to server: No route to host" triggers while connecting to PostgreSQL due to a number of reasons.
Make the Iptables rules different in Master and Slave.
iptables -L INPUT
iptables -P INPUT ACCEPT
iptables -P OUTPUT ACCEPT
iptables -P FORWARD ACCEPT
iptables -F INPUT
iptables -F OUTPUT
iptables  -F FORWARD
"SR BACKEND FAILURE 181" error - Fix it Now ?
This article covers how to fix "SR BACKEND FAILURE 181" error. Generally, user experiences issues with any storage related operations after installation or upgrade to XenServer 6.x.
As a workaround, you can remove all special characters from the virtual machine name-label and description fields. Contact our Technical Support to assist you in resolving the issue.
Note: Special character should not be used for the storage repository and description field.
Plesk git authentication failed - Fix it Now ?
This article covers how to authenticate via HTTP when connecting to a remote Git repository in Plesk. HTTP/HTTPS authentication is not supported.
Authentication should be performed with an SSH key generated by Plesk (refer to Use SSH Connection for details).
It is possible to use HTTP/HTTPS protocol only if a repository does not require authentication.


