Google Cloud's hosting services give your WordPress site improved performance, virtually limitless scalability, stronger security, greater control, and more flexibility. Many customers prefer hosting WordPress websites that require scalability, resiliency, and performance with Google cloud.
Here at Ibmi Media, as part of our Server Management Services, we regularly help our Customers to perform related Google Cloud.
In this context, we shall look into how to migrate a WordPress site to Google cloud.
How to Configure WordPress on Google Cloud ?
We can deploy WordPress on Google cloud with the steps below:
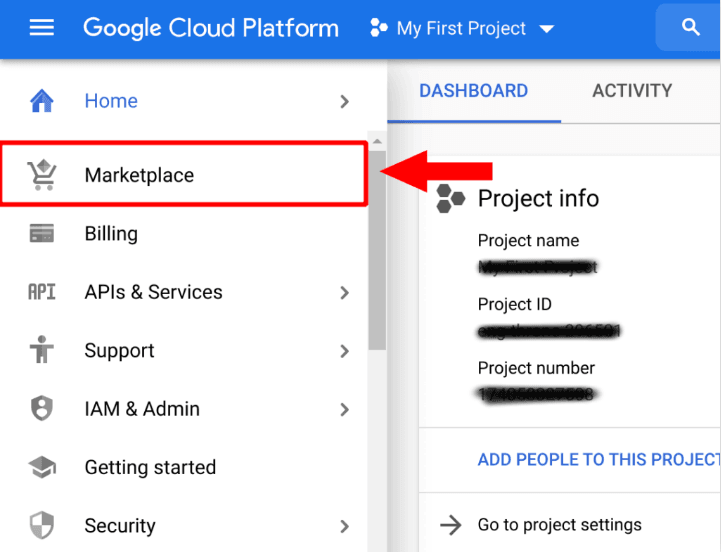
1. Deploy WordPress
i. From the Google Cloud sidebar menu, navigate to Marketplace.
ii. From the Marketplace dashboard, type wordpress into the search field, then select the WordPress Certified by Bitnami and Automattic.
iii. Click on the LAUNCH button to begin configuring WordPress instance.
2. Customize Deployment
Modify our instance configuration according to the settings above, making sure to change the Zone to represent where most of our website’s visitors are located. We can also upgrade the Machine type and/or Boot disk size in GB accordingly. Finally, click on the Deploy button to deploy our WordPress instance.
3. Configure Domain
As our WordPress instance has been deployed, we will configure a domain name for our new WordPress website.
- First, we need to navigate to VM Instances dashboard and copy the IP address that has been assigned to our WordPress instance.
- Now, we need to enable DNS settings. From our web browser, navigate to our domain name provider. Navigate to the settings page for our domain and select the corresponding provider from the NAMESERVERS row.
- Then, we need to create DNS Record. Next, click on the Advanced DNS tab at the top-right of our domain name dashboard. Then, in the HOST RECORDS row, create a new A record. However, replace the IP address with the IP address of our instance. Next, create a CNAME record record for www.
4. Configure SSL
As our website's domain name has been configured, we shall enable SSL for our domain name. To do this, we will connect to our WordPress instance via the SSH terminal. Then execute a script that will automate the process of configuring SSL for our website.
First, we need to connect to WordPress Instance. Return to VM Instances dashboard and click on the SSH button in order to connect to our WordPress instance.
Then, we will execute SSL Script. Now that we have clicked the SSH button, a new terminal window will open displaying the connection to our WordPress Instance. Execute the following command into the terminal window:
$ sudo /opt/bitnami/bncert-tool
After we have pressed Enter, the script will prompt with a series of questions, which we will answer by entering either y (for yes) or n (for no).
We have successfully deployed a fully-functional WordPress website on Google Cloud Platform. However, there are still some very important steps to complete like retrieving our login credentials and login to our WordPress website, and optionally import an existing WordPress website.
5. Login to WordPress
Now we need to login to WordPress with the steps below:
- From the Google Cloud sidebar menu, navigate to Marketplace.
- From the Marketplace dashboard, click on Your solutions.
- Select our recent deployment from the list.
- Next, copy both the Admin user and Admin password (Temporary) from the list. We will use these credentials to login to our WordPress website in the next step.
- Visit the WordPress login page and use the username and password to login to our website.
6. Assign a Static IP Address
By default, the WordPress instance is assigned an ephemeral IP address, which means that if our WordPress instance is ever stopped or restarted, its IP address will change. This is not desirable and can cause networking problems for our website.
To prevent this issue, we need to reserve a static IP address for our WordPress instance.
To do this, follow the steps given below:
- From Google Cloud Platform dashboard, navigate to Networking > External IP addresses.
- If we already have a website configured, click the down arrow under the Type column and select Static for the External IP address that is connected to our instance.
How to Migrate WordPress to Google Cloud ?
Import a WordPress Website
We can use the All-in-One WP Migration Unlimited Plugin to quickly export and import our existing WordPress website to its new location on Google Cloud.
Follow the steps given below:
Download WP Migration Plugin
From our existing WordPress website, head over to "Add Plugins" and download the All-in-One WP Migration plugin.
The free version of All-in-One WP Migration plugin limits the WordPress upload file size to 512MB. If our WordPress file size is greater than 512MB, download the unlimited version of the plugin and upload it to WordPress plugins library.
Export Website File
Activate the All-in-One WP Migration plugin and access it by clicking the link in our WordPress sidebar column. From the All-in-One WP Migration dashboard, enter our existing website URL in the Find field and our new website URL in the Replace with field. Finally, export our website by selecting Export To > File.
Import Website File
From our new WordPress Website installation, download the All-in-One WP Migration plugin and go to Import From > File. Choose the export file that we downloaded in the previous step.
Change Permalink Structure
After we have successfully imported our WordPress website to Google Cloud, we will need to reset our permalink structure. From our WordPress dashboard, go to Settings > Permalinks and select the permalink structure that we prefer (for example, Post name).
After finishing with the WordPress migration, we can uninstall or deactivate the All-in-One WP Migration plugin.
[Need urgent assistance with migrate WordPress to Google Cloud? – We're available 24*7. ]
Conclusion
This article covers how to Migrate WordPress to Google Cloud. If you have a WordPress website, and want to move it on google cloud platform, then WordPress migration is the way of achieving it. You can move your WordPress manually or by using a free or paid WordPress plugin.
To migrate WordPress to google cloud you have to follow those basic steps below:
- Compress (Zip) your WordPress files folders.
- Create a copy of your MySQL database.
- Upload WordPress .zip file and MySQL .sql file to google cloud server.
- Point your DNS to google cloud.
To migrate WordPress to Google cloud you have to export an exact copy of your database to google cloud.
There are multiple ways to do that:
- Export database using myPhpAdmin.
- Export database using a free WordPress Plugin.
- Export database using terminal (command line).


