Vultr provides a great network, enabling you to spin up and easily scale a low latency infrastructure solution no matter where you or your customers may be!
In addition to the public network attached to every Vultr instance, you can configure up to five private networks per location. Private networks allow instances within a location to communicate without exposing the traffic to the public internet.
Here at Ibmi Media, as part of our Server Management Services, we regularly help our Customers to perform related Vultr network queries.
In this context, we shall look into steps to Enable private networking in Vultr.
How to Enable private networking Vultr ?
Following are the steps to follow in order to enable private networking on Vultr for our customers.
1. Create a Private Network
Generally, we can create up to 5 private networks per location. Private networks will not be able to communicate between locations, regardless of IP addressing. For example, server instances in Miami can not see private networks in Dallas.
Following are the steps with which we can create a network:
- First, navigate to the Network tab.
- Then select the Private Networks menu item.
- And click the blue plus icon.
- Then choose Add Network.
- And select a location.
- After that Add description.
- Next we have to accept the suggested IP network address range or supply our own.
- Finally click Add Network.
- Once we complete the creation of a private network, we can assign it to an instance.
2. Assign Private Network to an Instance
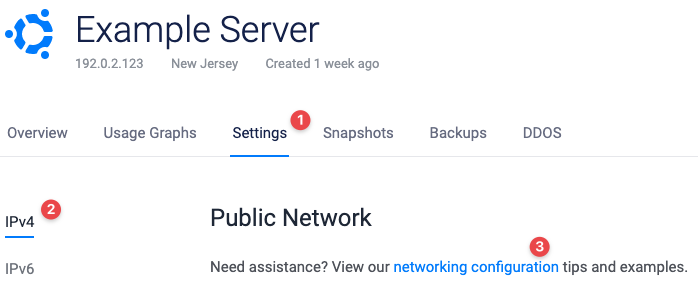
A portion of the IPv4 Settings screen for an example instance is shown below.
We use Manage (1) to create a private network.
For detaching a private network from an instance, we can use the trashcan icon (2).
And for adding a private network to an instance, we can select the network (3) and click Attach Network (4)
The server will reboot to activate the network adapter.
3. Manage Private Networks via API
The Vultr API offers several endpoints to manage private networks.
Following are a few of them:
i. Manage a network
- Create a new private network in a region.
- Get information about a private network.
- Update information for a private network.
- Delete a private network.
ii. List all networks
- Get a list of all private networks in your account.
iii. Manage private networks for an instance
- List the private networks for an Instance.
- Attach a private network to an instance.
- Detach a private network from an instance.
How to Configure a Private Network on Ubuntu 17.10 through 20.04 ?
For this set up we need to verify that private networking is enabled on our cloud server. The private network device is ens7 and the public network device is ens3 in the below example.
Following are the steps we can use for creating the private network:
1. Firstly we need to find the MAC address of the ens7 adapter. For this we can use the following command:
# ip addr
2. After that we need to look for the link/ether value of adapter ens7, as in the example below (00:00:00:00:00:00):
3: ens7: <BROADCAST,MULTICAST> mtu 1500 qdisc noop state DOWN group default qlen 1000link/ether 00:00:00:00:00:00 brd ff:ff:ff:ff:ff:ff
3. Then populate /etc/netplan/10-ens7.yaml with the following text.
network:
  version: 2
  renderer: networkd
  ethernets:
    ens7:
      match:
        macaddress: 00:00:00:00:00:00
      mtu: 1450
      dhcp4: no
      addresses: [10.10.10.3/16]
We can either update networking or reboot the server:
# netplan apply
How to Configure a Private Network on CentOS 8 ?
1. Firstly, we need to verify that private networking is enabled on our cloud server. The private network device is ens7 and the public network device is ens3.
2. Then edit /etc/sysconfig/network-scripts/ifcfg-ens7
# nano /etc/sysconfig/network-scripts/ifcfg-ens7
3. After that change 10.10.10.3 to the selected private IP address and replace the contents of ifcfg-ens7 with:
TYPE="Ethernet"
DEVICE="ens7"
ONBOOT="yes"
BOOTPROTO="none"
IPADDR=10.10.10.3
PREFIX=16
MTU=1450
4. Finally, restart the connection or reboot.
# nmcli con load /etc/sysconfig/network-scripts/ifcfg-ens7
# nmcli con up 'System ens7'
[Need assistance in fixing Linux System Networking issues? We can help you. ]
Conclusion
This article covers how to enable private networking vultr for our customers. Vultr provides many flexible networking options for your cloud servers. Private networks do not have DHCP. When deploying a Vultr cloud server with private networking, you must manually configure the private adapters or supply your own DHCP server.
To setup a private IP address:
- Allocate an IP range.
- Go to the VPC networks page in the Cloud Console. Open the VPC networks page.
- Under Name, click the VPC network in which you want to create a private Cloud Data Fusion instance.
- On the VPC network details page, click the Private service connection tab.
- Click Allocate IP range.


