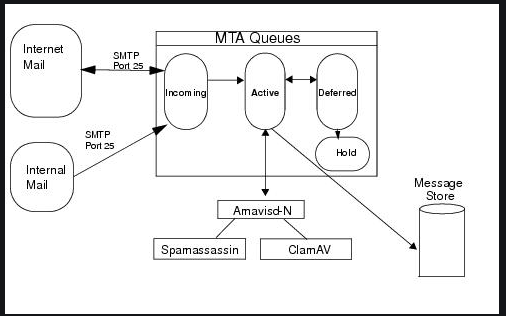
Are you experiencing NOQUEUE messages for emails on Zimbra Amavis? Do you need to configure whitelist and blacklist Zimbra Amavis Spam filtering?
This tutorial is for you.
Zimbra Amavis Spam filtering can be set for both domains, email addresses and IP networks/addresses.
Here at Ibmi Media, as part of our Server Management Services, we regularly help our Customers to configure whitelist and blacklist for their Email software.
In this context, we shall look into the steps to configure Zimbra Amavis Spam filtering.
More information about Amavis?
Amavis is a high-performance interface between mailer (MTA) and content checkers: virus scanners, and/or SpamAssassin.
It communicates to MTA via (E)SMTP or LMTP, or by using helper programs.
Amavis is best with Postfix, fine with dual-sendmail setup and Exim v4, works with sendmail/milter, or with any MTA as an SMTP relay.
Zimbra and Amavis
Zimbra uses Amavis to scan incoming and outgoing emails for viruses. Then depending on the result of the scan, it gives postfix reply whether it should deliver or drop the email.
In most cases, you will get false negatives which are most common with files having encryption or the executable ones.
To prevent this we can whitelist the trustworthy domain, email address, or network. Also in the case of spamming, we can blacklist the domain or IP as well.
The types of messages logged by Amavis are:
i. NOQUEUE: Postfix has not assigned a queue-id to this message as of yet.
ii. Sender address triggers FILTER smtp-amavis:[127.0.0.1]:10026: This means it will filter emails through Amavis. By default, it will trigger all sender addresses.
Whitelist or Blacklist a domain or email address on Zimbra Amavis
The following process are steps taken by our Support Experts to configure whitelist and blacklist Zimbra Amavis Spam filtering;
1. Start by creating two files that will store the domains and email addresses we wish to whitelist or blacklist. To do this , execute the command;
$ sudo touch /opt/zimbra/conf/{whitelist,blacklist}All whitelists will be in the file /opt/zimbra/conf/whitelist, and the IPs in the blacklist can be seen in the file /opt/zimbra/conf/blacklist.
For Example, we can execute:
$ cat /opt/zimbra/conf/whitelistibmimedia@example.com example.org$ cat /opt/zimbra/conf/blacklistspammer@example.comfakedomain.comAfter that we modify our /opt/zimbra/conf/amavisd.conf by adding the below lines.
read_hash(%whitelist_sender, '/opt/zimbra/conf/whitelist');read_hash(%blacklist_sender, '/opt/zimbra/conf/blacklist');After that, we save the changes and restart the Amavis service.
sudo su - zimbra -c "zmamavisdctl restart"We can then retry to send emails from a domain/address in the blacklist or the ones in the whitelist.
As a result, we will be able to see that mail delivery is fine now.
How to whitelist certain IP ranges on Zimbra Amavis?
If we have any trust able network, like an internal network, we can exclude checks for these networks.
Start by configuring this on Amavis, we need to enable the bypass feature which is seen 'disabled' by default. To do this, execute;
$ sudo su - zimbra$ zmprov mcf zimbraAmavisOriginatingBypassSA TRUEOnce we enable this we have to restart the following services related to Amavis by running the commands;
zmantispamctl restartzmantivirusctl restartzmamavisdctl restartAmavis then bypasses SpamAssassin for all messages originating from internal networks that are trustworthy.
[Need further support with Zimbra Amavis Spam filtering configuration? We are here for you!]
How to update a list of trusted MTA networks?
First, we can check the setting for the current list of trustable networks by executing;
$ sudo su - zimbra$ postconf mynetworks$ zmprov gs `zmhostname` zimbraMtaMyNetworksNext, we can use the following commands to update trustworthy networks in the MTA
$ sudo su - zimbra$ zmprov ms `zmhostname` zimbraMtaMyNetworks '127.0.0.0/8 10.0.0.0/8 192.168.3.0/22'The zmconfigd will automatically restart the MTA processes after this change is made.
[Still, trying to configure Zimbra Amavis Spam filtering? We are here for you!]
Conclusion
This article will guide you on the steps to configure whitelist and blacklist on Zimbra Amavis for Zimbra Amavis Spam filtering.
This article will guide you on the steps to configure whitelist and blacklist on Zimbra Amavis for Zimbra Amavis Spam filtering.


