Need to figure out using Differencing Disks in Hyper-V for Quick VM Deployment?
This guide can help you.
A Hyper-V differencing disk is a type of disk which can be used for storing the changes taking place in the parent virtual hard disk.
Here at Ibmi Media, as part of our Server Management Services, we regularly help our Customers to perform Microsoft related tasks.
In this context, We shall look into Differencing Disks in Hyper-V.
Differencing Disks in Hyper-V
Differential disks are to create snapshots and various VM backup systems use them. While creating a snapshot or a backup, the current VM state is saved to a VHD file.
A Hyper-V differencing disk is a virtual hard disk. We use it to store the changes made to another virtual hard disk or the guest OS.
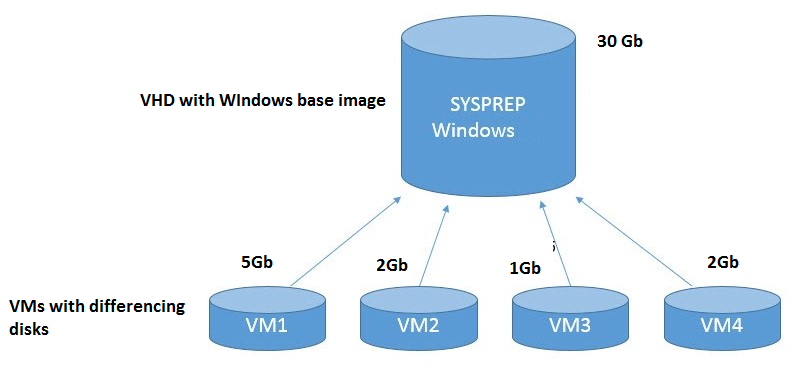
Another interesting opportunity of differencing disks is creating some basic OS image (VHD file) with all necessary settings and software. Thus, using this image, we can quickly deploy multiple virtual machines that use the VHD of the base image and write all changes to their own virtual disks. Hence, it achieves significant savings in disk space.
The example below shows that using differential disks for 4 VMs based on a single VHD image will require only 40 GB of disk space. Whereas, with the traditional deployment model, we need 150 GB.
A Hyper-V differencing disk, unlike common VHD, rigidly attaches to another parent disk.
The differential disk is a child disk and does not contain the full version of the data on the VM disk. It has only the changes the VM made during its operation.
The parent (template) VHD image stays untouched. All child virtual machines on the base of it write the changes to their own differencing disks. The size of a differencing disk is rather small.
Hyper-V differencing disks have the following properties:
i. A Hyper-V differencing disk always relates to another virtual hard disk, together they form a parent-child relationship.
ii. It selects a parent disk when we create the Hyper-V differencing disk.
iii. They can store any app installs, security patches, etc. allowing us to isolate changes and leave the parent disk intact.
iv. Hyper-V differencing disks can be ideal for development and test purposes.
v. It can grow dynamically, meaning that the child disk grows in size only when new data is written to it.
Using Differencing Disks in Hyper-V for Quick VM Deployment
To use differencing disks in Hyper-V for quick VM deployment, our Support Techs suggest following these methods:
1. Create a Reference VHD Image
We can create a reference VHD file using the Hyper-V Manager GUI or PowerShell. PowerShell is much faster.
We should install the Hyper-V module for Windows PowerShell to use the following cmdlets:
Enable-WindowsOptionalFeature -Online -FeatureName Microsoft-Hyper-V-Management-PowerShell2. Create a new VHDX file:
new-vhd -path f:\vms\vhd\WinSrv2016Base.vhdx -SizeBytes 50GB –DynamicCreate a new VM based on it:
new-vm -Name TemplateVM –Path f:\vms\vhd\ -VHDPath f:\vms\vhd\WinSrv2016Base.vhdx | `set-vmmemory -DynamicMemoryEnabled $true -MaximumBytes 2GB -MinimumBytes 512MB -StartupBytes 1GBMount the ISO file with the image of the desired OS:
add-vmdvddrive -VMName TemplateVM -Path d:\WindowsServer2016DC.ISOAfter we create the new VM, we need to install an OS on it. This OS must configure appropriately (install drivers, update and change the system settings).
Then generalize the OS for further deployment using Sysprep:
cd %SystemRoot%\System32\Sysprep
sysprep /generalize /oobe /shutdown
Thus, we get a reference VM image.
Now we can remove the VM itself (after saving its VHDX file). To avoid accidentally changing this VHD file, which may crash all child VMs, make it ReadOnly:
Set-ItemProperty f:\vms\vhd\WinSrv2016Base.vhdx -Name IsReadOnly -Value $true[Stuck with reference VHD image? Contact us now!]
Create Differencing Disks and VMs on Hyper-V
Now we can create several dependents (child) VHDx files:
New-VHD -ParentPath: f:\vms\vhd\WinSrv2016Base.vhdx -Path f:\vms\vhd\Win2016-diff1.vhdx -Differencing
New-VHD -ParentPath: f:\vms\vhd\WinSrv2016Base.vhdx -Path f:\vms\vhd\Win2016-diff2.vhdx –Differencing
When we create a differencing disk using the graphic interface, select VHDX-> Differencing as a disk format. Then specify its name and the path to the parent disk.
Using these VHDx files, we create two Hyper-V virtual machines:
New-VM -Name “Win2016-diff1” -Generation 2 -MemoryStartupBytes 1GB -VHDPath f:\vms\vhd\Win2016-diff1.vhdx -SwitchName “External Network”
New-VM -Name “Win2016-diff2” -Generation 2 -MemoryStartupBytes 1GB -VHDPath f:\vms\vhd\Win2016-diff2.vhdx -SwitchName “External Network”
In the end, start them:
Start-VM Win2016-diff*[Need help with the VM Deployment procedure? We are available 24*7]
Merge Differencing Disks in Hyper-V
In Windows 2008 R2 Hyper-V version, it's possible to merge differencing disks with the parent without stopping the VM.
There is a cmdlet to do it. Merge-VHD or a separate option in the Edit menu of the virtual disk in Hyper-V Manager.
Set-ItemProperty f:\vms\vhd\WinSrv2016Base.vhdx -Name IsReadOnly -Value $false
$Merge = @{
Path = ‘f:\vms\vhd\Win2016-diff2.vhdx’
DestinationPath = ‘f:\vms\vhd\Win2016.vhdx’
}
Merge-VHD @Merge
To reduce the load of the disk subsystem by multiple access to one parent VHD file, we recommend to place it on fast disks. To prevent this file from becoming the common failure point, think of the backup strategies for it.
[Still finding it difficult to merge Hyper-V deployment? We’d be happy to assist]
Conclusion
This article will guide you on the steps to use Differencing Disks in Hyper-V for Quick VM Deployment provides digital storage space for securing critical data.
This article will guide you on the steps to use Differencing Disks in Hyper-V for Quick VM Deployment provides digital storage space for securing critical data.


