Are you trying to Install and Configure Free VMware Hypervisor (ESXi) ?
This guide is for you.
VMware offers various paid versions of ESXi, but also provides a free version available for anyone to use.
Here at Ibmi Media, as part of our Server Management Services, we regularly help our Customers to perform VMware related Installation tasks.
In this context, we shall look into the steps to install VMware Hypervisor.
More information about Free VMware Hypervisor (ESXi) ?
VMware vSphere Hypervisor is a free, powerful, and reliable hardware hypervisor for server and workstation virtualization.
Here, you will learn the methods to install and configure free VMware Hypervisor. We will also create a virtual machine, and install a guest operating system.
Free vSphere Hypervisor: Hardware Requirements, Restrictions & Compatibility
We can install VMware vSphere Hypervisor on a host that meets the following hardware requirements:
CPU:
Minimum – 1 processor, 2 cores
Recommended – Two processors, four or more cores per CPU
Memory:
Minimum – 4 GB
Recommended – 8 GB or higher
Network:
Minimum – One 1Gbit/s network adapter
Recommended – Two 1Gbit/s network adapters
Local Storage (SATA/SAS):
Minimum – One 4 GB drive
Recommended – RAID 1 with two 4 GB drives
VMware vSphere Hypervisor install image is quite small (311 MB) and contains only the most important drivers mainly for branded servers. However, sometimes we cannot install it on a server of a popular brand.
Often server manufacturers release their own VMWare hypervisor images containing specific drivers.
We visit https://www.vmware.com/resources/compatibility/search.php to see if VMware vSphere Hypervisor is compatible with the server model.
Furthermore, let's consider the limitations of free vSphere Hypervisor compared to the full-featured VMWare ESXi:
The difference between vSphere Hypervisor and VMWare ESXi is only in the applied license.
The same installation ISO image is used.
i. It does not provide the official VMWare support
ii. We cannot allocate more than 8 virtual processors/cores (vCPU) to one VM
iii. Cannot connect a host to the vCenter Server
iv. vStorage API is not available (we will not be able to configure normal backup)
v. There can be no more than 2 physical processors (sockets) on a server
vi. All APIs are available in read-only mode.
However, the free version of vSphere Hypervisor allows you to use all cores and RAM of a physical server without any restrictions. PCI VMDirectPath/USB redirection features are also available.
[Need assistance with the VMWARE configuration? We'd be happy to assist!]
How to Install Free VMware vSphere Hypervisor (ESXi)?
i. We can download the latest VMware Hypervisor vSphere 6.7 version from:
https://my.vmware.com/en/web/vmware/evalcenter?p=free-esxi6
ii. Initially, we sign in to a VMWare account or create a new one.
iii. If we create a new VMWare account, we will have to wait for an account confirmation e-mail. Then we follow the link in the e-mail and enter the password.
iv. Subsequently, we will get the license key for a free hypervisor version and the link to download VMware vSphere Hypervisor. Save the license key.
v. An ISO image will download, we can write it to a USB flash drive or a CD/DVD disk. Then we can install a hypervisor on a server.
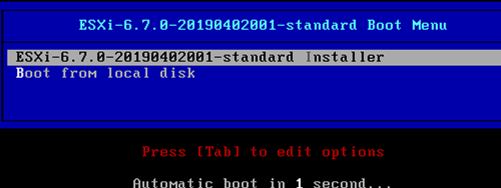
The installation is very simple. Boot the host from the install media and select "ESXi-6.7.0-2020xxx-standard installer".
vi. Specify the drive to install the operating system on.
vii. Then, select the keyboard layout.
viii. Finally, enter and confirm the root password (at least 7 characters)
ix. After the installation, a warning appears that the hypervisor will work only for 60 days without a license key.
x. Once done, restart the server. VMware vSphere Hypervisor has been installed.
If the server is connected to the network with the DHCP server, it will automatically receive the IP address. We can see it in the hypervisor console (called DCUI). This IP address is used to manage the hypervisor from the web interface.
[Stuck with the VMWARE installation? We are here for you!]
How to Configure Free VMware Hypervisor in the Direct Console User Interface (DCUI) ?
In order to manage ESXi hypervisor settings, press F2 on the DCUI screen, enter the login (root by default) and password we have set during the installation.
The graphic console of the initial hypervisor configuration will open:
Here we can set the following options:
i. Configure Password — change the root password.
ii. In the Configure Management Network, we can select the settings of management network adapters.
iii. Can specify the VLAN, in which the server management interface is located.
iv. We can configure IPv4 and IPv6 addresses. We can disable them, assign dynamic or static IPs. In most cases, an IP address, a subnet mask, and a default gateway address are set manually on the VMWare ESXi server.
v. DNS Configuration – here we can set DNS servers and set the hostname.
vi. In the Test Management Network, we can test the network connectivity and DNS name resolution.
Usually, it is worth to check the availability of gateway IP and servers in another network segment.
[Looking for an easy fix to VMWARE issues? We are available 24*7!]
ESXi Web Client Interface: Adding Free License Key
To connect to vSphere Hypervisor via the web interface, we enter the IP address of the server assigned during the initial ESXi configuration to the address bar in the browser. Then enter the login (root) and password.
Please note that the server will operate for 60 days without a license.
Then we have to activate the license: Manage -> Licensing -> Assign License.
If we do not activate the VMWare license, in 60 days all running VMs will work. However, we will not be able to power on any new VMs or restart the existing ones.
We have activated a permanent hypervisor license with an unrestricted amount of RAM size for our virtual machines.
Generally, we can allocate up to 8 virtual CPUs to each virtual machine.
Then, configure NTP server: Manage -> System -> Time & date -> Edit settings.
Sample Configuration on VMWare ESXi Virtual Switch
The vSphere Switch is a virtual device that transfers data between virtual machines on the server or out through a physical NIC.
There are two types of virtual switches:
Standard Switches
They are simple virtual switches logically located inside a physical server.
Distributed Switches
These are virtual switches that can distribute to multiple physical servers. They are not available in the free VMWare Hypervisor version.
After we install and run the hypervisor, there is a built-in virtual switch (vSwitch0). It includes a physical adapter (vmnic0), and two groups of ports: a Management Network to manage the hypervisor and a network for VMs to transfer data.
However, the hypervisor management interface vmk0 (vmkernel port) belongs to the Management Network group.
In most cases, one virtual switch on a stand-alone hypervisor will be enough. We have to create port groups if we want to isolate virtual machines from each other and use different VLAN settings for port groups.
Unless necessary, we do not make any change to the Management Network or vmkernel port. We may lose access to the hypervisor management interface.
If we lose access to the hypervisor, we can reset network settings using the Network Restore Options menu in the DCUI console.
How to create a Virtual Machine in VMWare Hypervisor ?
i. Select Virtual Machines -> Create / Register VM -> Create a new virtual machine in the web interface.
ii. Enter the name of the virtual machine. Then, select the type and version of the guest operating system. We enable “Windows Virtualization Based Security” to make hardware virtualization, IOMMU, EFI, and Secure Boot available to the guest OS.
iii. Additionally, select the storage for the configuration files and data disks of the virtual machine.
iv. If the size of free space on the selected disk is less than its size, we will get a notification prompting us to increase the datastore size.
v. In this step, all virtual machine parameters are set: the number of CPUs, the RAM size, the size and location of the hard disk files, etc.
To get network access from the virtual machine, place its adapter to the VM Network port group on vSwitch0
If we try to allocate more than 8 vCPUs for a VM, we will see this error: “Failed to power on a virtual machine. There are insufficient licenses to complete this operation”.
If needed, we can change all these settings later when the virtual machine will be turned off.
Finally, we will be prompted to check all virtual machine settings and confirm them.
How to Install a Guest OS on a Virtual Machine?
To install a guest OS on a virtual machine, we have to upload the ISO with the OS distribution we need and save it in the local datastore.
i. Select Storage in the Navigation menu and click the Datastore Browser.
ii. Then, create a folder to save distributions.
iii. Select the created directory, click Upload on the top left, select the ISO install image, and wait till the upload is over.
iv. Then, select the newly created virtual machine and click Actions -> Edit Settings.
v. Change the settings of the CD/DVD drive as shown in the screenshot below. Select ISO image in CD/DVD Media.
vi. Then just turn on the virtual machine. The VM tries to boot from the ISO image and the installation of the guest OS from the virtual CD/DVD drive begins.
vii. After we install the guest OS, we can use it as usual.
[Failed to Configure Free VMware Hypervisor? Contact us now!]
Conclusion
This article will guide you on the process to Configure Free VMware Hypervisor, to create a virtual #machine, and install a guest operating system.
“VMware vSphere Hypervisor #VMware #vSphere #Hypervisor is a free product that provides a simple and easy way to get started with #virtualization at no cost.


