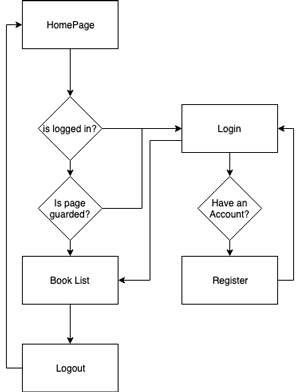
We can create a login application and routing to pages can be done using Ionic Auth Guard in order to prevent access to pages if the user is not logged in.
Here at Ibmi Media, as part of our Server Management Services, we regularly perform App related tasks.
In this context, we shall look into how to create Login and Routing to pages using Ionic Auth Guard.
Login and Routing to pages using Ionic Auth Guard
Ionic uses Angular Routing. So it becomes easy to add authentication in an Ionic application using Auth Guards. Today, we shall create a simple login application to quickly demonstrate how we can implement Angular Guards in Ionic to prevent access to pages if the user is not logged in.
1. Create a new Ionic Application
i. First, we will create an Ionic application using the latest Ionic CLI.
$ npm install -g @ionic/cliii. Next, we create a new Angular Ionic blank application. For that, we run the below command.
$ ionic start IonicAuthGaurds blank --type=angulariii. In order to store values in local storage for the login process, we will install the storage package by running the below command.
$ npm install --save @ionic/storageiv. Then we will create Login and Home pages and AuthGuard and Authentication Serives. For that, we run these below commands.
$ ionic g page login$ ionic g page home$ ionic g service services/authentication$ ionic g service services/authGuard
Import services and Storage module in the app.module.ts file:
import { NgModule } from '@angular/core';import { BrowserModule } from '@angular/platform-browser';import { RouteReuseStrategy } from '@angular/router';import { IonicModule, IonicRouteStrategy } from '@ionic/angular';import { SplashScreen } from '@ionic-native/splash-screen/ngx';import { StatusBar } from '@ionic-native/status-bar/ngx';import { AppComponent } from './app.component';import { AppRoutingModule } from './app-routing.module';import { IonicStorageModule } from '@ionic/storage';import { AuthGuard } from './services/AuthGuard.service';import { AuthenticationService } from './services/Authentication.service';@NgModule({declarations: [AppComponent],entryComponents: [],imports: [BrowserModule,IonicModule.forRoot(),AppRoutingModule,IonicStorageModule.forRoot()],providers: [StatusBar,SplashScreen,AuthGuard,AuthenticationService,{ provide: RouteReuseStrategy, useClass: IonicRouteStrategy }],bootstrap: [AppComponent]})export class AppModule { }
Then in AuthenticationService, we add some basic methods like login() , logout() , isLoggedIn() and isAuthenticated() as shown below:
import{Injectable } from '@angular/core';import{Router } from '@angular/router';import{Storage } from '@ionic/storage';import{ToastController, Platform } from '@ionic/angular';import{BehaviorSubject } from 'rxjs';@Injectable()export class AuthenticationService {authState = new BehaviorSubject(false);constructor(private router: Router,private storage: Storage,private platform: Platform,public toastController: ToastController) {this.platform.ready().then(() => {this.ifLoggedIn();});}ifLoggedIn() {this.storage.get('USER_INFO').then((response) => {if (response) {this.authState.next(true);}});}login() {var response = {user_id: '007',user_name: 'test'};this.storage.set('USER_INFO', response).then((response) => {this.router.navigate(['home']);this.authState.next(true);});}logout() {this.storage.remove('USER_INFO').then(() => {this.router.navigate(['login']);this.authState.next(false);});}isAuthenticated() {return this.authState.value;}}
Usually, in the login function, the user info will be stored in the local storage. And the user will be redirected from the login page to the home page. Then the auth status will be changed to true.
After logging out, the User info stored during the login will be removed and the auth status will be cleared to false.
Add Angular Auth Guard CanActive to Prevent Unauthorized Access in Ionic after Login
Angular provides Guards to prevent navigation and loading of routes.
canActivate
i. Service has a canActivate method which will result in either true or false depending on whether the user should be permitted to go to that route or not.
ii. If the canActivate method results false, then the user will be unable to access the route.
In order to implement Guards, we add canActivate parameter attribute on Routes in the app-routing.module.ts file.
import { NgModule } from '@angular/core';import { Routes, RouterModule } from '@angular/router';import { AuthGuard } from './services/AuthGuard.service';
const routes: Routes = [{ path: '', redirectTo: 'login', pathMatch: 'full' },
{ path: 'login', loadChildren: './login/login.module#LoginPageModule' },{ path: 'home', loadChildren: './home/home.module#HomePageModule',canActivate: [AuthGuard]}];@NgModule({imports: [RouterModule.forRoot(routes)],exports: [RouterModule]})export class AppRoutingModule { }
In order to convert this service into and an Angular Guard, we will implement CanActivate in service AuthGuard.
For that, we add the following code in AuthGuard.service file to be used in canActivate parameter in Routes:
import { Injectable } from '@angular/core';import { CanActivate } from '@angular/router';import { AuthenticationService } from './Authentication.service';@Injectable()export class AuthGuard implements CanActivate {constructor(public authenticationService: AuthenticationService) {}canActivate(): boolean {return this.authenticationService.isAuthenticated();}}Check User Authentication on App Load after Login and routing to pages
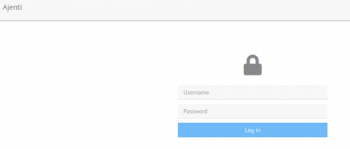
On the login page, we will have a Login button which will add user values to local storage.
If we add a Go to Home link to demonstrate CanActive Guard usage, On this clicking the link, we are simply redirecting to the dashboard page. But the authentication of the user is not done, so it will alert the user by an alert to login first. On the Home, we will have a logout button to clear the authentication state and move back to login.
Login HTML and Component code:
login.page.html
<ion-button (click)="loginUser()">login</ion-button><a [routerLink]="['/home']">Go to home</a>
login.page.ts
import { Component, OnInit } from '@angular/core';import { AuthenticationService } from '../services/Authentication.service';@Component({selector: 'app-login',templateUrl: './login.page.html',styleUrls: ['./login.page.scss'],})export class LoginPage implements OnInit {constructor(private authService: AuthenticationService) { }ngOnInit() {}loginUser(){this.authService.login()}}
Similarly, on the home page in HTML template, we have a logout button in a component we will call logout() method from AuthenticationService :
home.page.html
<ion-content padding><ion-button (click)="logoutUser()">Logout</ion-button></ion-content>
home.page.ts
import { Component, OnInit } from '@angular/core';
import { AuthenticationService } from '../services/Authentication.service';@Component({selector: 'app-home',templateUrl: './home.page.html',styleUrls: ['./home.page.scss'],})export class HomePage implements OnInit {constructor(private authService: AuthenticationService) { }ngOnInit() {}logoutUser(){this.authService.logout();}}[Need urgent assistance with the Ionic Application? – Our experts can help you. ]
Conclusion
This article will guide you on how to create Login and Routing to pages using #Ionic Auth Guard.
Auth-guard makes use of CanActivate interface and it checks for if the user is logged in or not. If it returns true, then the execution for the requested route will continue, and if it returns false, that the requested route will be kicked off and the default route will be shown.
To create a login page in ionic 4:
1. GETTING STARTED. After making sure you have the latest version on Ionic and Cordova installed, let's go and create an #app now and integrate authentication in it.
2. Update app/app. #module.
3. Create User Model.
4. Updating Services.
5. Add #Auth #Guard.
6. Update Pages.