Are you trying to perform KVM live migration?
This guide is for you.
VPS providers rapidly adopt high-density server virtualization solutions to achieve maximum economies of scale. We attain this by hosting a maximum number of virtual machines in a physical server.
However, adding too many virtual machines may cause overload or affect the virtual machine performance.
A virtual machine (VM) can be migrated from one host to another host. This migration can be a live migration or pause migration.
You can initiate the migration using:
i. The virsh migrate command or virt-manager console in case of Kernel-based Virtual Machine (KVM) environment.
ii. RHEV-M web interface in case of Red Hat Enterprise Virtualization (RHEV) environment.
iii. The Cluster Server (VCS) hagrp -migrate operation (the hagrp -migrate command initiates live migration only).
Here at Ibmi Media, as part of our Server Management Services, we regularly help our Customers to perform KVM related queries.
In this context, we shall look into how to use KVM live migration to fix performance issues in a server virtualization solution.
What is virtual server migration?
To balance the resources in a virtual server environment to improve performance, we use migration.
Here, we move a guest virtual machine from one host physical machine to another.
Live migration goes one step ahead and enables the VM to move while it runs. It enables moving a guest VM without affecting that VM in any manner.
Upon successful completion, the guest starts to run on the destination host.
However, if the migration fails, the guest continues to run on the source host.
In migration, the state of the guest VM's memory transfers from the source to the destination machine. This ensures that there is no noticeable change for users accessing the sites in that VM.
During migration, KVM monitors the source for any changes in pages of the guest VM it has already transferred. Live migration is therefore usually done during off-peak business hours when the changes in the guest VM is considerably less.
Live migration for zero downtime
We perform the migration of VMs for our customer's virtualization systems to achieve zero downtime in a variety of cases, such as:
i. Capacity management to improve performance.
ii. Hardware or software maintenance or upgrades.
iii. Infrastructure management for cost efficiency.
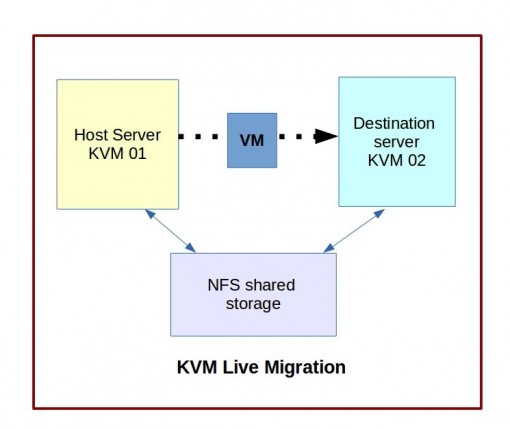
Recently we had a VPS provider hosting VPSs in a KVM server virtualization system.
The VPSs were hosted in two KVM servers – KVM 01 and KVM 02.
The customers in one server KVM 01 were often complaining of intermittent VPS slowness and then Ibmi Media Support Experts came to help.
Upon checking, we could see that most of the resource-intensive VMs were running in the server KVM 01, causing it to be slow.
To improve the speed and responsiveness of the server virtualization system, we have to load balance the VPSs between the two servers.
Resolving Common issues during live migration ?
KVM live migration helps to solve capacity issues, infrastructure upgrades, etc with zero downtime for the VMs.
But if careful consideration is not given, there can be VM downtime or even data loss.
1. Migration failure because of compatibility issues
If the configuration of host and destination servers are not proper or if there is a mismatch in time zone, network configuration, or KVM versions, the migration may fail.
To ensure a successful migration, we first chose the ideal candidates for migration. We do this after monitoring the performance of the VMs and considering their CPU utilization, their dependency on the host server, and the time required for migration.
To perform live migration in KVM, we ensure that the KVM versions and OS installation in both servers were compatible.
We install the libvirt service on both host and destination servers, both running with the same type of CPUs.
Then we configure the host and destination servers with the same network configuration and time zone settings to avoid synchronization issues.
2. Migration failure due to network interruptions
Since the VPSs host different businesses, each has a different OS in it – CentOS, Fedora, RHEL, and so on.
To enable a VM to work fine in the new server, its OS image should be available in the destination server also. However, migrating the OS image requires a lot of time and bandwidth.
The VM migration may fail or interrupt due to network failures. As a workaround, we store the OS images for all VPSs in a shared location and share them via NFS with the other server.
The OS image for this VPS store in the folder “/var/lib/libvirt/images” in the host server KVM 01. To share the OS image with the destination server, we configure the host as an NFS server and add the destination server as its NFS client.
The OS images folder configures in the file ‘/etc/exports’ for NFS sharing.
The nfs service restart in the host and the OS images folder was then mounted in the destination server KVM 02.
The images folder mount on the same path on both servers:
root@KVM01:~# apt-get install nfs-kernel-serverroot@KVM02:~# mount KVM01.cpiv.com:/var/lib/libvirt/images /var/lib/libvirt/imagesAs the OS image does not transfer over servers but is in a secure NFS location, it ensures better data security.
3. Virsh utility to perform the migration
To live migrate VMs between two servers, we configure virsh, a tool based on libvirt, to perform management tasks on VMs.
We can configure it within custom scripts to perform various tasks such as migration and helps to automate the tasks easily.
Migration can also be done using virt-manager, the GUI for libvirt. We chose virsh to do the task in our design, as we could implement the tasks without any manual intervention.
We identify the resource-consuming VPSs in KVM 01 and migrate them to the second server KVM 02.
Live KVM migration with virsh
The first step in migration is to verify that the guest virtual machine is running:
root@KVM01:~# virsh list Id Name State —————————————————- 4 VPS-01 runningThe next stage is to migrate the guest virtual machine from host to destination server.
Once the NFS share successfully mount and the server configurations are done, we successfully complete migration of the VM VPS-01 from our host to the destination server using virsh utility:
root@KVM01:~# virsh migrate --live VPS-01 qemu+ssh://KVM02.cpiv.com/systemThe final stage is to verify the guest's virtual machine arrival at the destination host.
The VPS migrates in a few seconds to the new server and we verify that it is running fine in the destination server.
Once the live migration is complete, the migrated VM deactivates from the host server:
root@KVM02:~# virsh list Id Name State---------------------------------------------------- 3 VPS-01 running[Need urgent help with Virtual Server live migration? We'd be happy to assist. ]
Conclusion
This article covers how to use KVM live migration to achieve load balancing which is important in a server virtualization system to maintain server performance.
Migration enables an administrator to move a virtual machine instance from one compute host to another. A typical scenario is planned maintenance on the source host, but migration can also be useful to redistribute the load when many VM instances are running on a specific physical machine.
Kernel-based Virtual Machine (KVM) is an open source virtualization technology built into Linux.
Specifically, KVM lets you turn #Linux into a #hypervisor that allows a host machine to run multiple, isolated virtual environments called guests or virtual machines (VMs).
Live migration of virtual machines is necessary when you need to achieve high-availability setups and load distribution.
The #KVM hypervisor has been a powerful alternative to Xen and VMware in the Linux world for several years.
To make the virtualization solution suitable for enterprise use, the developers are continually integrating new and useful features.
An example of this is live migration of virtual machines (VMs).
Live #migration involves:
The instance keeps running throughout the migration.
This is useful when it is not possible or desirable to stop the application running on the instance.
Live migrations can be classified further by the way they treat instance storage:
1. Shared storage-based live migration. The instance has ephemeral disks that are located on storage shared between the source and destination hosts.
2. Block live migration, or simply block migration. The instance has ephemeral disks that are not shared between the source and destination hosts. Block migration is incompatible with read-only devices such as CD-ROMs and Configuration Drive (config_drive).
3. Volume-backed live migration. Instances use volumes rather than ephemeral disks.
Block live migration requires copying disks from the source to the destination host.
It takes more time and puts more load on the network. Shared-storage and volume-backed live migration does not copy disks.


