Are you trying to set up Varnish with Apache?
This guide will help you.
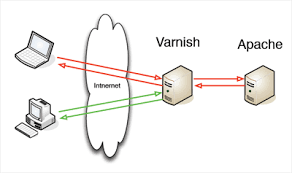
Varnish Cache (commonly known as Varnish), is an open-source, popular reverse-proxy HTTP accelerator intended for speeding up web servers.
Varnish is an HTTP accelerator designed for content-heavy dynamic web sites as well as APIs. In contrast to other web accelerators, such as Squid, which began life as a client-side cache, or Apache and nginx, which are primarily origin servers, Varnish was designed as an HTTP accelerator.
Here at Ibmi Media, as part of our Server Management Services, we regularly help our Customers to perform Apache related queries.
In this context, we shall look into how to configure Varnish with Apache.
How to configure Varnish with Apache ?
Now let's take a look at how our Support Experts configure install and use Varnish Cache 6.5 as a front-end to an Apache web server in CentOS 7 (also works on RHEL 7).
Step 1. Install Apache Web Server on CentOS 7
1. First, we install the Apache HTTP server from the default CentOS software repositories using the YUM package manager as below.
# yum install httpd2. After the Apache installation completes, we start it for the time being and enable it to start automatically at system boot.
# systemctl start httpd
# systemctl enable httpd
# systemctl status httpd
3. Next, we update system firewall rules to permit inbound packets on port 80 using the below commands.
# firewall-cmd –zone=public –permanent –add-service=http
# firewall-cmd –reload
Step 2. Install Varnish Cache on CentOS 7
1. Now there are pre-compiled RPM packages for the latest version of Varnish Cache. So we need to add the official Varnish Cache repository.
Before that, we need to enable the EPEL repository to install several dependency packages:
# yum install -y epel-release2. Next, we install pygpgme, a package for handling GPG signatures and yum-utils, a collection of useful utilities that extend yum’s native features in various ways.
# yum install pygpgme yum-utils3. After that, we create a file named /etc/yum.repos.d/varnishcache_varnish65.repo. It contains the repository configuration.
# vi /etc/yum.repos.d/varnishcache_varnish65.repoAlso, here we ensure to replace el and 7 in the config below with our Linux distribution and version:
[varnishcache_varnish65]
name=varnishcache_varnish65
baseurl=https://packagecloud.io/varnishcache/varnish65/el/7/$basearch
repo_gpgcheck=1
gpgcheck=0
enabled=1
gpgkey=https://packagecloud.io/varnishcache/varnish65/gpgkey
sslverify=1
sslcacert=/etc/pki/tls/certs/ca-bundle.crt
metadata_expire=300
[varnishcache_varnish65-source]
name=varnishcache_varnish65-source
baseurl=https://packagecloud.io/varnishcache/varnish65/el/7/SRPMS
repo_gpgcheck=1
gpgcheck=0
enabled=1
gpgkey=https://packagecloud.io/varnishcache/varnish65/gpgkey
sslverify=1
sslcacert=/etc/pki/tls/certs/ca-bundle.crt
metadata_expire=300
4. Now, we run the command below to update the local yum cache and install the varnish cache package.
# yum -q makecache -y –disablerepo=’*’ –enablerepo=’varnishcache_varnish65′
# yum install varnish
5. After installing Varnish Cache, the main executable will be installed as /usr/sbin/varnishd and varnish configuration files will be located in /etc/varnish/:
6. Now, we start the varnish service. Then we enable it so that it automatically starts during system boot and verify its status to ensure that it is up and running.
# systemctl start varnish
# systemctl enable varnish
# systemctl status varnish
7. We then can confirm that the Varnish installation was successful by seeing the location of the Varnish executable and version installed on our system:
$ which varnishd
$ varnishd -V
Step 3. Configure Apache to Work With Varnish Cache
1. Now, we configure Apache to work in conjunction with Varnish Cache. Apache listens on port 80 by default.
So we need to change the default HTTPD port to 8080 – this will ensure that HTTPD runs behind Varnish caching.
We make use of the sed command to change port 80 to 8080:
# sed -i “s/Listen 80/Listen 8080/” /etc/httpd/conf/httpd.confAlso, we need to change the port on our virtual host configuration for each website that we want to serve via Varnish.
Here is the configuration for our test site (/etc/httpd/conf.d/ibmimedia.com.conf):
<VirtualHost *:8080>
DocumentRoot “/var/www/html/ibmimedia.com/”
ServerName www.ibmimedia.com
# Other directives here
</VirtualHost>
2. Next, we open the varnish systemd configuration file. In this, we find the parameter ExecStart which specifies the port Varnish listens on and change its value from 6081 to 80.
# systemctl edit –full varnishOnce it finishes, the configuration should look like this.
ExecStart=/usr/sbin/varnishd -a :80 -f /etc/varnish/default.vcl -s malloc,256m3. Next, we set up Apache as a backend server for Varnish proxy, in the /etc/varnish/default.vcl configuration file.
# vi /etc/varnish/default.vclThen we find the backend section and define the host IP address and port.
Here is the default backend configuration, we set this to point to our actual content server:
backend default {
.host = “127.0.0.1”;
.port = “8080”;
}
In case, if the backend server is running on a different server with address 10.42.1.10, then the host parameter should point to this IP address:
backend server1 {
.host = “10.42.1.10”;
.port = “8080”;
}
4. After performing all the necessary configurations, restart HTTPD and Varnish cache to effect the above changes:
# systemctl daemon-reload
# systemctl restart httpd
# systemctl restart varnish
Step 4. Test Varnish Cache on Apache
Finally, we test, if Varnish is enabled and working with the HTTPD service using the below cURL command:
# curl -I http://localhostHow to fix Varnish Cache Server Error ?
We have received many requests from our customers to resolve the below error that occurs due to varnish cache:
error: Error 503 Service Unavailable / Guru Meditation with an XID number.This error means that the web server trying to be reached is unavailable – this could be because it is overloaded, down for maintenance, or not fully functional for another reason.
Generally, Varnish Cache issues the Guru Meditation error when a connection has timed out or the Varnish Cache server has made too many requests to the back end server without getting a response.
Now let's see how our Support Experts resolve this error.
1. First, we look into the logs for all 503 errors. In order to get varnishlog to log 503 errors, we use the below command from Varnish Cache:
$ varnishlog -q ‘RespStatus == 503’ -g requestNormally, we get 503 errors because our back end is down.
In this case, varnishlog could return something like “FetchError c no backend connection”.
So we must check the port Varnish Cache is trying to connect to, the origin server and HTTP services such as Apache or Nginx, and see if all of that is operating correctly – if it is not, we will need to troubleshoot the back end.
However, if the backend seems to be up and running well and still we are getting 503 varnish cache error then there is something wrong with the web server's connection to Varnish Cache or the Varnish cache configuration.
2. Then we change or add a .connect_timeout = Xs and a .first_byte_timeout = Xs in the backend default VCL section to a timeout length that works for web server.
3. Also, we try disabling KeepAlive so that idle connections will be dropped.
This would look like the below:
“origin”: {
“address”: “origin.example.com”,
“disable_keepalive”: true
}
[Need urgent assistance with Apache queries? – We are here to help you. ]
Conclusion
This article covers how to configure Varnish #cache on the #Apache server. Varnish is an HTTP accelerator and a useful tool for speeding up a server, especially during a times when there is high traffic to a site.
It works by redirecting visitors to static pages whenever possible and only drawing on the virtual private server itself if there is a need for an active process.
#Varnish is a caching HTTP reverse proxy. It receives requests from clients and tries to answer them from the cache.
Where is varnish configuration file?
The Varnish configuration file will be located in the /etc/varnish directory in CentOS 7.
To make Varnish work in front of Apache, you will need to set up some basic configurations.
By default Varnish listens on port 6081 .
You will need to change port 6081 to 80 so that website requests access the Varnish cache first.
What is varnish WordPress?
Varnish is a full-page cache and HTTP preprocessor which can be used to speed up requests for a WordPress site.
Setting up Varnish is a technical task, as it requires installing and configuring a system package on a web server, rather than just installing a plugin.


