
Redis Slow Log - More about it
This article covers how Redis Slow Log works. Redis Slow #Log is one of the best tools to debug and trace the Redis database.
The Redis Slow Log is a system to log queries that exceeded a specified execution time.
The execution time does not include I/O operations like talking with the client, sending the reply and so forth, but just the time needed to actually execute the command (this is the only stage of command execution where the thread is blocked and can not serve other requests in the meantime).
You can configure the slow log with two parameters:
1. slowlog-log-slower-than tells Redis what is the execution time, in microseconds, to exceed in order for the command to get logged. Note that a negative number disables the slow log, while a value of zero forces the logging of every command.
2. slowlog-max-len is the length of the slow log. The minimum value is zero. When a new command is logged and the slow log is already at its maximum length, the oldest one is removed from the queue of logged commands in order to make space.
Redis Slow Log configuration can be done by editing redis.conf or while the server is running using the CONFIG GET and CONFIG SET commands.
Available since 2.2.12.
This #command is used in order to read and reset the Redis slow queries log.
Redis slow log overview
The #Redis Slow Log is a system to log queries that exceeded a specified execution time.
Slowlog, as its name, is used to record commands whose execution time exceeds limitation (a little slow).
The execution time does not include I/O operations like talking with the client, sending the reply and so forth, but just the time needed to actually execute the command (this is the only stage of command execution where the thread is blocked and can not serve other requests in the meantime).
The Redis SLOWLOG is used to help identify queries which are taking too long to execute.
You can configure the slow log with two parameters:
slowlog-log-slower-than tells Redis what is the execution time, in microseconds, to exceed in order for the command to get logged. Note that a negative number disables the slow log, while a value of zero forces the logging of every command. slowlog-max-len is the length of the slow log. The minimum value is zero. When a new command is logged and the slow log is already at its maximum length, the oldest one is removed from the queue of logged commands in order to make space.
The configuration can be done by editing redis.conf or while the server is running using the CONFIG GET and CONFIG SET commands.
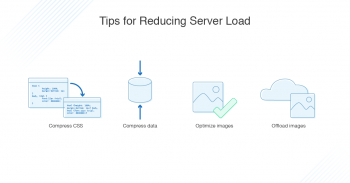
Methods to reduce server load
This article covers tips to reduce server load. The load speed of websites mainly depends on the constant load that the server is maintained.
Load expresses how many processes are waiting in the queue to access the computer processor. This is calculated for a certain period of time, and the smaller the number the better.
Tips To optimize and speed up your server:
1. Enable caching.
2. Setup a fast reverse proxy.
3. Choose the right application server.
4. Fine tune your web server.
5. Turn on HTTP/2.
6. Defragment your database tables & optimize server settings.
7. Fix your DNS query speed.
8. Trim down your site's critical rendering path.
Why is your Website server slow?
The cause of slow servers usually lays with the web host.
You could be having a slow site because you are hosted on a free web hosting.
You are on a low quality hosting service with poor support.
Or your site needs a higher spec hosting account with more resources eg a VPS.
A large volume of unoptimized images is usually the most common reason behind website slowness.
High-resolution images can consume lots of bandwidth while loading.
Uploading larger sized images and then scaling them down can unnecessarily increase the size of your web page – causing your website to load slowly.
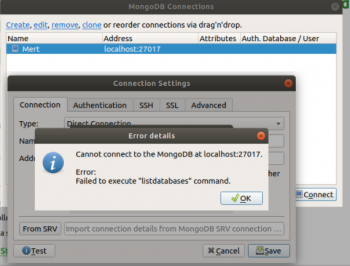
MongoDB failed to load list of databases - Fix it now
This article covers how to resolve the error 'MongoDB failed to load the list of databases' can occur due to various reasons that include failed database user/password authentication, outdated Robo 3T version, and so on.
The error 'MongoDB failed to load the list of databases' means that you can't connect if there are no databases to list.
To fix the error 'MongoDB failed to load the list of databases':
1. You can fix this issue with 1.2 connecting to a new mongo 4.2.
It's fixed when using robo3t version 1.3, which supports newer version of mongo.
2. You can create a database and a collection for it.
Once you create a database and a collection, it works.
3. You will need to upgrade mongodb to the last version, so you can to connect in your local database.

Authentication In Vue Using Vuex
This article covers how to perform Authentication In Vue Using Vuex.
Using Vuex allows us to store and manage authentication state and proceed to check state in our application using only a few lines of code.
To Set up the application modules:
For this project, we want to create a vue application that has vuex and vue-router.
i. We will use the vue cli 3.0 to create a new vue project and select router and vuex from the options.
Run the following command to set it up:
$ vue create vue-authii. Follow the dialogue that shows up, add the necessary information and select the options we need and complete the installation.
iii. Next, install axios:
$ npm install axios --save
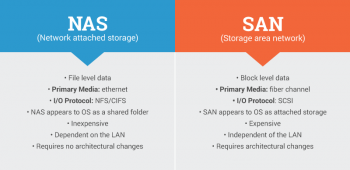
Advantages of SAN over NAS
This article covers more insight about the advantages of SAN over NAS.
A storage area network (#SAN) is a dedicated, independent high-speed network that interconnects and delivers shared pools of storage devices to multiple servers. Each server can access shared storage as if it were a drive directly attached to the server.
Network Attached Storage (#NAS) is a device that allows users to access files through a network. It allows users to access and share files from their individual stations through a central server. NFS (Network File System) is a protocol that is used to serve and share files on a network.
Some advantages of a SAN:
1. Reduces LAN bandwidth problems. A key benefit of SANs is bandwidth improvement. 2. Improved data security. Data security is paramount for every business.
3. Responsive backup.
4. Increased scalability.
5. Reliable disaster recovery.
What is the purpose of a SAN?
SANs are primarily used to access data storage devices, such as disk arrays and tape libraries from servers so that the devices appear to the operating system as direct-attached storage.
A SAN typically is a dedicated network of storage devices not accessible through the local area network (LAN).
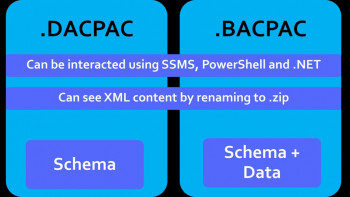
Difference between BACPAC and DACPAC - More insight
This article covers more information about BACPAC and DACPAC and the difference between BACPAC and DACPAC.
A BACPAC file is a ZIP file with an extension of BACPAC containing the metadata and data from the #database. A BACPAC file can be stored in Azure Blob storage or in local storage in an on-premises location and later imported back into Azure SQL Database, Azure SQL Managed Instance, or a SQL Server instance.
DACPAC = Data Tier AppliCation Package. DACPAC is a single file which contains database model i.e. all files represent database objects. It's a binary representation of database project compatible with SSDT. The name comes from an extension of these files.
Once you extract the contents of the #DACPAC file, you'll see there are four different XML files within it.
These XML files do not contain any data from the database.
The database is scripted out only with the model information.
To import from a #BACPAC file into a new single database using the Azure portal:
1. Open the appropriate server page and then, on the toolbar, select Import database.
2. Select the storage account and the container for the BACPAC file and then select the BACPAC file from which to import.
Data tier controls the servers where the information is stored;
1. It runs a relational database management system on a database server or a mainframe and contains the computer data storage logic.
2. The data tier keeps data independent from application servers or processing logic and improves scalability and performance.
To import a .BAK file into #SQL Server:
1. Open #SSMS and click on Connect.
2. First let us go with Bak File importing.
3. Check the Device Button and Click on it.
4. Click on Add Button, choose the Appropriate bak file and then click on Ok.


