
Install OpenCV on Ubuntu
This article will guide you on different methods to install OpenCV on #Ubuntu 20.04. Even though installing the packaged version from the Ubuntu repository is easier, building OpenCV from source gives you more flexibility, and it should be your first option when installing OpenCV.
#OpenCV is the huge open-source library for the computer vision, machine learning, and image processing and now it plays a major role in real-time operation which is very important in today's systems.
By using it, one can process images and videos to identify objects, faces, or even handwriting of a human.
To install the latest OpenCV version from the source:
1. Install the required dependencies:
sudo apt install build-essential cmake git pkg-config libgtk-3-dev \
    libavcodec-dev libavformat-dev libswscale-dev libv4l-dev \
    libxvidcore-dev libx264-dev libjpeg-dev libpng-dev libtiff-dev \
    gfortran openexr libatlas-base-dev python3-dev python3-numpy \
    libtbb2 libtbb-dev libdc1394-22-dev
2. Clone the OpenCV’s and OpenCV contrib repositories:
mkdir ~/opencv_build && cd ~/opencv_build
git clone https://github.com/opencv/opencv.git
git clone https://github.com/opencv/opencv_contrib.git
3. Once the download is complete, create a temporary build directory, and switch to it:
cd ~/opencv_build/opencv
mkdir build && cd build
4. Set up the OpenCV build with CMake:
cmake -D CMAKE_BUILD_TYPE=RELEASE \
    -D CMAKE_INSTALL_PREFIX=/usr/local \
    -D INSTALL_C_EXAMPLES=ON \
    -D INSTALL_PYTHON_EXAMPLES=ON \
    -D OPENCV_GENERATE_PKGCONFIG=ON \
    -D OPENCV_EXTRA_MODULES_PATH=~/opencv_build/opencv_contrib/modules \
    -D BUILD_EXAMPLES=ON ..
5. Start the compilation process:
make -j86. Install OpenCV with:
sudo make installTo uninstall OpenCV Linux:
i. If you installed OpenCV from package manager, it's best to remove those packages. Check: apt list --installed | grep opencv .
ii. If you built it yourself, and you still got the build folder, run sudo make uninstall from the OpenCV build directory.

SSH Connection Refused
This article will guide you on how to resolve SSH connection error occur.
Sometimes while connecting to SSH servers, users often encounter "Connection refused" error by port 22. It happens because of several reasons like SSH service is not running, the port is blocked by the firewall, or the server is using a different port.
It can also occur because of the IP conflict issue.
To SSH on Ubuntu, Open your terminal either by using the Ctrl+Alt+T keyboard shortcut or by clicking on the terminal icon and install the openssh-server package by typing: sudo apt update sudo apt install openssh-server. Once the installation is completed, the SSH service will start automatically.
To resolve ssh connection refused:
1. Install an SSH tool such as OpenSSH on the server you want to connect to using the sudo apt install openssh-server command.
2. If your firewall is blocking your SSH connection. Disable the firewall rules blocking your SSH connection by changing the destination port's settings to ACCEPT.

LXC container vs VM
This article will deal with the differences between LXC container and VM as well as which to choose. VMs are the best choice if you need to host multiple applications in the same environment for multiple purposes. LXC containers are preferred in cases where you have a single-purpose application environment.
KVM is hardware-level virtualization with its own kernel instance.
This allows the user to boot their own operating system of choice with no underlying or base OS.
And since each server is its own instance, they can be migrated without having to reboot.
Advantages to LXC:
1. It is easier to maintain and has very little overhead on deployment compared to a virtual machine. This allows for a much more lightweight cloud environment with LXC.
2. Containers also have a faster startup and stop speed, making them much more efficient overall.
3. Multiple containers can be deployed on the host system, where VMs are heavier on resources.
About robots txt allow and disallow
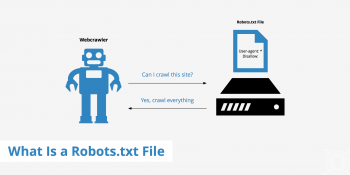
This article will guide you on how to create robots.txt and fix #errors related to it. Basically, we can instruct the crawler as to which page to crawl and which page not to crawl using the #robots .txt allow and disallow directives.
Web site owners use the /robots. txt file to give instructions about their site to web robots; this is called The Robots Exclusion Protocol.
The "Disallow: /" tells the robot that it should not visit any pages on the site.
1. The robots. txt file can tell crawlers where to find the XML #sitemap file(s), how fast the site can be crawled, and (most famously) which webpages and directories not to crawl.
2. The robots. txt file, also known as the robots exclusion protocol or standard, is a text file that tells web robots (most often search engines) which pages on your site to crawl.
3. It also tells web robots which pages not to crawl.
txt file.
4. The asterisk after “user-agent” means that the robots.

Troubleshoot Azure Cache for Redis timeouts
This article will guide you on how to troubleshoot Azure #Cache for Redis #timeouts. Azure Cache for Redis regularly updates its server software as part of the managed service functionality that it provides.
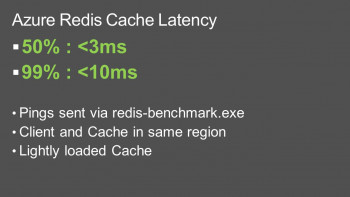
Azure Cache for #Redis is a fully managed, in-memory cache that enables high-performance and scalable architectures. Use it to create cloud or hybrid deployments that handle millions of requests per second at sub-millisecond latency—all with the configuration, security, and availability benefits of a managed service.
This patching activity takes place largely behind the scene. During the failovers when Redis server nodes are being patched, Redis clients connected to these nodes may experience temporary timeouts as connections are switched between these nodes.
To help mitigate #Azure memory issues:
1. Upgrade the cache to a larger size so that you aren't running against memory limitations on the system.
2. Set expiration times on the keys so that older values are evicted proactively.
3. Monitor the used_memory_rss cache metric. When this value approaches the size of their cache, you're likely to start seeing performance issues. Distribute the data across multiple shards if you're using a premium cache, or upgrade to a larger cache size.
To fix #CPU bound on the server or on the client:
i. Check if you're getting bound by CPU on your client. High CPU could cause the request to not be processed within the synctimeout interval and cause a request to time out.
ii. Moving to a larger client size or distributing the load can help to control this problem.
iii. Check if you're getting CPU bound on the server by monitoring the CPU cache performance metric. Requests coming in while Redis is CPU bound can cause those requests to time out. To address this condition, you can distribute the load across multiple shards in a premium cache, or upgrade to a larger size or pricing tier.
Troubleshoot Redis latency Issues
This article will guide you on steps to troubleshoot Redis #latency problems.
#Amazon #ElastiCache allows you to seamlessly set up, run, and scale popular open-source compatible in-memory data stores in the cloud.
Build data-intensive apps or boost the performance of your existing databases by retrieving data from high throughput and low latency in-memory data stores.
#Redis #performance monitoring metrics:
1. Used Memory
"memory_used" gives the total amount of memory in bytes that is used by the Redis server. If it exceeds physical memory, system will start swapping causing severe performance degradation.
2. Peak used memory
"memory_used_peak" metric calculates and displays the highest amount of memory in bytes consumed by the Redis server.
3. Used CPU system
The metric "cpu_used_sys" gets the total amount of system CPU consumed by the Redis server. High CPU usage is not bad as long as it doesn't exceed CPU limit.
4. Used CPU user
The metric "cpu_used_user" records the total amount of user CPU consumed by the Redis server.
5. Used CPU user children
The metric "cpu_used_user_children" records the total amount of user CPU consumed by other background processes.
6. Used CPU system children
Get the total amount of system #CPU consumed by background processes with the metric "cpu_used_sys_children".
7. Rejected connections
Use the metric "total_conn_rec" and get the total number of connections accepted by the Redis server.
8. Connected clients
Get the total number of slave connections made to the Redis server with the metric "conn_slaves".


