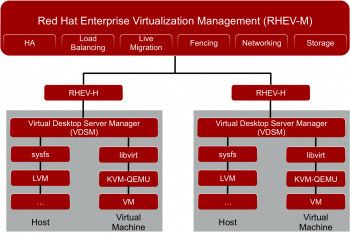
Steps to Deploy Virtual Machines in RHEV Environment
This article will guide you on how to #deploy #virtual #machines in the #RHEV environment and also on #Linux and #Windows virtual machines.
A Virtual Machine (#VM) is a compute resource that uses software instead of a physical computer to run programs and deploy apps. One or more virtual "guest" #machines run on a physical "host" machine.
The main purpose of VMs is to operate multiple operating systems at the same time, from the same piece of hardware. Without virtualization, operating multiple systems — like Windows and Linux — would require two separate physical units.
The two basic types of virtual machines are process and system VMs:
1. A process virtual machine allows you to run a single process as an application on a host machine.
2. A system virtual machine is a fully virtualized #VM designed to be a substitute for a physical machine.
Your virtual machine internet connection goes through your computer and through your router. So they can track your router's #IP address, and possibly track you down at least to your city, if not to individual street or house.
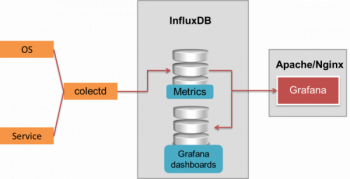
Install InfluxDB on CentOS 7
This article will guide you on steps to Install #InfluxDB on #CentOS 7. You can Turn any InfluxData #instance into a production-ready cluster that can run anywhere. Easily create and share a comprehensive monitoring solution.
InfluxDB is similar to a #SQL #database, but different in many ways. Relational databases can handle time series data, but are not optimized for common time series workloads. InfluxDB is designed to #store large volumes of time series data and quickly perform real-time analysis on that data.
The local InfluxDB configuration file is located here: Linux: /etc/influxdb/influxdb. conf. macOS: /usr/local/etc/influxdb.
To Install InfluxDB:
Option 1 : Download the InfluxDB archive via the browser.
Option 2 : Adding the #repositories to your package manager.
i – Start your InfluxDB service.
ii – Configure your InfluxDB instance.
iii – Test your InfluxDB instance.
iv – #Download InfluxDB 2.0 archive from the website.
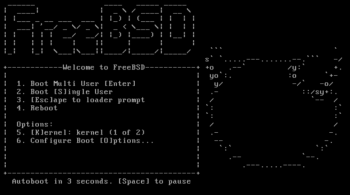
Using FreeBSD Single-User Mode to recover from File System Corruption
This article will guide you on how to recover from #File #System #Corruption Using FreeBSD's Single-User Mode.
While #filesystem corruption is never a good thing, it doesn't necessarily mean that all of your important data was lost. The success of your #recovery #operations comes down to a number of factors, such as how quickly the filesystem noticed the corruption, how widespread the issue was, and what files were affected.
Corrupted files are computer files that suddenly become inoperable or unusable. There are several reasons why a file may become corrupted. In some cases, it is possible to recover and fix the corrupted file, while at other times it may be necessary to delete the file and replace it with an earlier saved version.
To fix corrupted files in #Windows 10:
1. Use the #SFC tool.
2. Use #DISM tool.
3. Run SFC scan from Safe Mode.
4. Perform SFC scan before Windows 10 starts.
5. Replace the files manually.
6. Use System #Restore.
7. Reset your Windows 10.
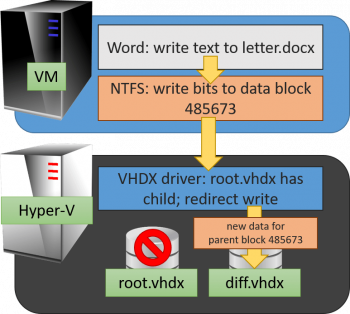
Standard and Production Checkpoints in Hyper-V
This article will guide on how to choose between #Standard or #production #checkpoints in Hyper-V. We also look into the various aspects of standard and production checkpoints.
Hyper-V checkpoints allow IT #administrators to easily save the existing state of a virtual machine before any changes are made so that if a problem crops up due to the changes, the VM can revert to its previous state. A #snapshot of the virtual machine #memory state is not taken when using a production checkpoint.
To Change checkpoints to production or standard checkpoints:
1. In Hyper-V Manager, right-click the virtual machine and click Settings.
2. Under the Management section, select Checkpoints.
3. Select either production checkpoints or standard checkpoints.

OpenLDAP on Ubuntu Steps to install it
This article will guide you on the steps to #install and configure #OpenLDAP on #Ubuntu.
OpenLDAP is a open source implementation of #LDAP in Linux.
If it's your #server, you will know just by looking at the running services. When you are there, run #netstat and probably you will see LDAP listening only on localhost . Remotely, if the server is listening on #localhost , you cannot know just by running nmap , the port will not answer for the public #interface.
To Install and Configure OpenLDAP on #CentOS / #RHEL #Linux:
1. Install OpenLDAP Packages. On CentOS and RedHat, use yum install as shown below, to install the openldap related packages.
2. LDAP #Config Files. config.
3. Create olcRootDN Account as Admin.
4. Create olcRootPW Root Password.
5. Create olcSuffix #Domain Name.
6. Verify The #Configuration Files.
7. Start the LDAP Server.
8. Verify the LDAP Search.

Instant File Initialization in SQL server
This article will guide you on how to enable Instant File Initialization (#IFI) in #SQL Server.
Disk space reservation without initialization is called Instant File Initialization.
To enable #database instant file initialization:
1. First, go to Start Menu and run secpol.msc to bring up Local #Security #Policy.
2. Expand the Local Policies Folder.
3. Click on User Rights Assignment.
4. Go to the Perform Volume Maintenance Tasks option and double click it.
5. Add your SQL Server Service account, and click OK.
6. Restart your SQL Server services (MUST DO).


