Cannot Copy and Paste via RDP - How to fix this Windows issue
This article covers how to Allow/Prevent Copy and Paste via RDP Clipboard on Windows. Copy and paste is an essential function that should ideally work every day without fail. You can resolve this Windows issue by restarting the rdpclip.exe program in the remote computer.
Also, you can log off the remote user and then log back on on Windows.
Once the rdpclip.exe is relaunched, you should be able to copy paste using clipboard from the local computer to the remote computer.
In order to fix the copy and paste issue in Windows, you need to end the rdpclicp.exe process and then restart it:
To do this;
1. Press Ctrl + Shift + ESC to start Task Manager.
2. Go to the "Details" tab.
3. Right-click the "rdpclip.exe" process.
4. Select "End task".
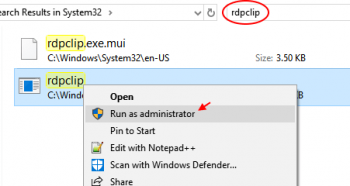
5. Go to Windows/system32 folder.
6. Look for "rdpclip.exe" and run it.

Enable Built-in Administrator Account on Windows 10 - How to implement this
This article covers an easy way to activate the administrator account is from the command prompt with elevated privileges. Windows 10 includes a built-in Administrator account that, by default, is hidden and disabled for security reasons. Sometimes, you need to perform a bit of Windows management or troubleshooting or make changes to your account that requires administrator access.
Windows 10 administrator default password will not be required, alternatively you can enter password for local account and sign in.
To know if I have the built-in Administrator account in Windows 10:
1. Right-click the name (or icon, depending on the version Windows 10) of the current account, located at the top left part of the Start Menu, then click on Change account settings.
2. The Settings window will pop up and under the name of the account if you see the word "Administrator" then it is an Administrator account.
To reset the built-in Administrator account in Windows 10:
1. Boot from Windows 10 bootable CD/DVD or USB.
2. When the install now screen shows up click on Repair your computer > Advanced Options >Troubleshoot > Command Prompt.
3. Once you can boot into the command prompt, type "net user administrator /active:yes".
To enable hidden administrator:
1. Go to Security Settings > Local Policies > Security Options.
2. The policy Accounts: Administrator account status determines whether the local Administrator account is enabled or not.
3. Check the "Security Setting" to see if it is disabled or enabled.
4. Double-click on the policy and select "Enabled" to enable the account.

This App Has Been Blocked for Your Protection on Windows - Fix it now
This article covers methods to fix the 'This App Has Been Blocked for Your Protection on Windows' error. Windows Defender SmartScreen acts as a sort of guard dog while you use Windows 10.
It will block you from opening some apps if they come from an unknown place or are created by an unknown publisher.
Some apps really are harmful and really will get you in a mess. Only go around the Windows 10 app block if you know for sure that the file is safe.
To unblock an app that is blocked by the administrator:
1. Locate the file, right-click it, and select "Properties" from the contextual menu.
2. Now, find the "Security" section in the General tab and check the checkbox next to "Unblock" - this should mark the file as safe and let you install it.
3. Click "Apply" to save the changes and try to launch the installation file again.
To Unblock Programs In Windows Defender Firewall:
1. Select the “Start” button, then type “Firewall“.
2. Select the “Windows Defender Firewall” option.
3. Choose the "Allow an app or feature through Windows Defender Firewall" option in the left pane.
To install a program that is blocked by administrator:
1. Disable Windows SmartScreen.
2. Execute the file via Command Prompt.
3. Install the app using the hidden administrator account.
4. Temporarily disable your antivirus program.
Run Scripts on Remote Computers – Implementing with PowerShell Remoting
This article covers how to Run Scripts on Remote Computers. You can run commands on one or hundreds of computers with a single PowerShell command. Windows PowerShell supports remote computing by using various technologies, including WMI, RPC, and WS-Management.
PowerShell Core supports WMI, WS-Management, and SSH remoting. In PowerShell 6, RPC is no longer supported. In PowerShell 7 and above, RPC is supported only in Windows.
Windows PowerShell Remoting
Using the WS-Management protocol, Windows PowerShell remoting lets you run any Windows PowerShell command on one or more remote computers.
You can establish persistent connections, start interactive sessions, and run scripts on remote computers.
To use Windows PowerShell remoting, the remote computer must be configured for remote management.
Once you have configured Windows PowerShell remoting, many remoting strategies are available to you.
How to Start an Interactive Session ?
To start an interactive session with a single remote computer, use the Enter-PSSession cmdlet.
For example, to start an interactive session with the Server01 remote computer, type:
Enter-PSSession Server01
The command prompt changes to display the name of the remote computer.
Any commands that you type at the prompt run on the remote computer and the results are displayed on the local computer.
To end the interactive session, type:
Exit-PSSession
Automatically Log in to Windows without Password - How to get this done
This article covers methods to automatically log in to Windows without password.
Here, you can disable password login on Windows 10 and boot the computer directly to the user’s desktop. In order to temporarily disable automatic logon in Windows and manually specify the user credentials under which you need to sign in, you must hold down the Shift key while Windows is booting.
CMD is the official and tricky way to bypass Windows 10 admin password. In this process, you will need a Windows Installation disk and If you don't have the same, then you can create a bootable USB drive consisting of Windows 10. Also, you need to disable UEFI secure boot option from the BIOS settings.
To Disable Windows 10 Login Password via the User Account Settings:
1. Press Win+R;
2. In the Run dialog box, enter netplwiz or control userpasswords2 command;
3. In the next window with the list of local user accounts, uncheck the option “User must enter a username and password to use this computer” and save changes (OK);
To Automatically log in to your Windows 10 PC:
1. Open the Run command box (Start > All apps > Windows System > Run or press Windows key + R).
2. A User Accounts window will open.
3. A new window labeled Automatically sign in will pop up.
4. Your computer will now bypass the log-in page when you turn on your PC, but it will not bypass the login page when you unlock your PC.

Steps to Run Program without Admin Privileges and to Bypass UAC Prompt
This article covers how to run a program without admin privileges. The trick to bypass UAC is to create a scheduled task (with highest privileges) for each program that you want to run, and then invoke the scheduled task item manually using schtasks.exe .
UAC helps keep your computer secure. If you reflexively disable UAC when setting up a computer, you should give it another try – UAC and the Windows software ecosystem have come a long way from when UAC was introduced with Windows Vista.
To Eliminate UAC Prompts for Specific Applications:
1. In Task Scheduler, right-click "Task Scheduler Library" and select "New Folder" Name it whatever you would like.
2. Select the new folder and click "Create Task" (not "Create Basic Task")
3. Name the task something descriptive. ...
4. Under the Actions tab, select "Start a program" in the Action dropdown if it isn't already.
To bypass UAC administrator password:
1. Right-click Start button at left lower corner of PC, select Control Panel.
2. Click User Accounts and family Safety.
3. Click User Accounts.
4. Click Change your account type.
5. Enter Admin password and click Yes to continue.
6. Select Administrator as your new account type, and click Change Account Type.


