Broken trust relationship between workstation and domain - Fix it now
This article covers tips to fix the 'broken trust relationship between workstation and domain' problem.
The underlying problem when this error is seen is that the machine you are trying to access can no longer communicate securely with the Active Directory domain to which it is joined.
Method to fix The trust relationship between this workstation and the primary domain failed Windows issue:
To resolve this issue, remove the computer from the domain, and then connect the computer to the domain.
1. Use a local administrator account to log on to the computer.
2. Select Start, press and hold (or right-click) Computer > Properties.
3. Select Change settings next to the computer name.
4. On the Computer Name tab, select Change.
5. Under the Member of heading, select Workgroup, type a workgroup name, and then select OK.
6. When you are prompted to restart the computer, select OK.
7. On the Computer Name tab, select Change again.
8. Under the Member of heading, select Domain, and then type the domain name.
9. Select OK, and then type the credentials of the user who has permissions in the domain.
10. When you are prompted to restart the computer, select OK.
11. Restart the computer.
Code 9c57 Windows Update Error - Fix it now
This article covers fix the Code 9c57 Windows Update Error. Error Code 9c57 generally corresponds to a failed installation of Internet Explorer 11. In addition to that, the KB 2882822 update requires validation of genuine Windows installed on the system, so you may visit the link referred in the third question and check if your Windows requires activation.
What is 'Error code 9c57' in Windows Update?
Windows Update error 9c57 is an error that may occur when you are trying to install “Windows IE9 in Windows 7 for x64 Based System” update.
How can you fix ‘Error code 9c57’ in Windows Update?
Some of the common fixes include:
1. Manually installing Internet Explorer
2. Deleting SoftwareDistribution and running DISM command and sfc/ scannow command
Causes of Windows Update Error 9C57 - Error 9C57:
During software design, programmers code anticipating the occurrence of errors.
However, there are no perfect designs, as errors can be expected even with the best program design. Glitches can happen during runtime if a certain error is not experienced and addressed during design and testing.
To fix Windows Update Error 9C57 - Error 9C57:
1. When you get a runtime error, keep in mind that it is happening due to programs that are conflicting with each other.
The first thing you can do to resolve the problem is to stop these conflicting programs.
2. Update / Reinstall Conflicting Programs
3. Virus infection causing runtime error on your computer must immediately be prevented, quarantined or deleted. Make sure you update your virus program and run a thorough scan of the computer or, run Windows update so you can get the latest virus definition and fix.
4. You might be getting the error because of an update, like the MS Visual C++ package which might not be installed properly or completely. What you can do then is to uninstall the current package and install a fresh copy.
5. You might also be experiencing runtime error because of a very low free space on your computer.
6. If the error is related to a bad graphics driver, then you may do the following:
Open your Device Manager, locate the graphics driver
Right click the video card driver then click uninstall, then restart your computer
The Windows Installer Service could not be accessed error - Fix it now
This article covers methods to resolve the Windows #Installer Service could not be accessed #error which occurs while we try to install a program in Windows or when you are running Windows in safe mode.
Windows Installer popups may be caused by Windows configuration issues, by Windows Update prompting you to install updates or by malware.
To fix #Windows installer error:
1. Click Start. , type services.
2. Right-click Windows Installer, and then click Properties.
3. If the Startup type box is set to Disabled, change it to Manual.
4. Click OK to close the Properties window.
5. Right-click the Windows Installer service, and then click Start.
6. Try to install or to uninstall again.
To fix error 1719 windows installer service could not be accessed:
1. Start the Windows Installer Service.
2. Stop and then Restart Windows Installer Service.
3. Reset the settings of Windows Installer Service in the registry.
To to Disable Windows Installer:
1. Log into Windows. Click the "Start" button.
2. Double-Click "Group Policy" in the left pane.
3. Expand the tree in the left side of the pane, "Local Computer Policy\Computer Configuration\Administrative Templates\Windows Components\Window Installer".
4. Double click "Disable Windows Installer.
To enable Windows Installer in Safe Mode:
1. Press Windows + R, type cmd, and press Ctrl + Shift + Enter to run CMD as administrator.
2. Type the command net start msiserver in Command Prompt window, and press Enter to enable Windows Installer in Safe Mode in Windows 10.
Enable and Configure MPIO on Windows Server 2016 2012 R2
This article covers how to enable Multi-Path Input-Output or MPIO on a Windows server either from a graphical interface using the Server Manager console or from the PowerShell command line.
Multipathing is the technique of creating more than one physical path between the server and its storage devices. It results in better fault tolerance and performance enhancement. Oracle VM Servers are installed with multipathing enabled because it is a requirement for SAN disks to be discovered by Oracle VM Manager.
To Install MPIO in Windows Server 2008 R2:
Note You must restart the server after you follow these steps.
1. Open Server Manager. To do this, click Start, click Administrative Tools, and then click Server Manager.
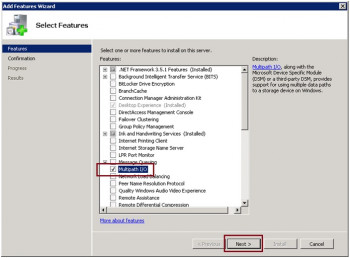
2. In Server Manager, click Features, and then click Add Features.
3. Select the Multipath I/O feature for installation, and then click Next.
4. Finish the installation by confirming the selections, and then restart the server.
To Configure MPIO for StorSimple volumes:
MPIO must be configured to identify StorSimple volumes.
To configure MPIO to recognize StorSimple volumes, follow these steps:
1. Open the MPIO configuration. To do this, click Start, click Administrative Tools, and then click MPIO.
2. In the MPIO window, click Add on the MPIO Devices tab.
3. Type SSIMPLE Model in the Add MPIO Support window under Device Hardware ID.
4. Restart the server when you are prompted.
To Mount a StorSimple volume in Windows Server 2008 R2:
After MPIO is configured on the server, volumes that are created on the StorSimple appliance can be mounted and can take advantage of MPIO for redundancy.
To mount a volume, follow these steps:
1. Open the iSCSI Initiator Properties dialog box on the server. To do this, click Start, click Administrative Tools, and then click iSCSI Initiator.
2. In the iSCSI Initiator Properties dialog box, click the Discovery tab, and then click Discover Portal.
3. Type the IP address of the "DATA" port on the StorSimple appliance.
Note If you use a private network for iSCSI connections, type the IP address of the DATA port that is connected to the private network.
4. Click the Targets tab in the iSCSI Initiator Properties dialog box. This displays the StorSimple appliance iSCSI qualified name (IQN) in the Discovered Targets section.
5. Click Connect to establish the iSCSI session with the StorSimple appliance. In the Connect To Target dialog box, click to select the Enable multi-path check box.
6. Open Server Manager. To do this, click Start, click Administrative Tools, and then click Server Manager.
7. In Server Manager, click Storage, and then click Disk Management. Volumes that are created on the StorSimple appliance and that are visible to this server appear under Disk Management as new disks.
8. Initialize the disk and create a new volume. During the format process, select a block size of 64 kilobytes (KB).
9. Under Disk Management, right-click the disk, and then click Properties.
10. In the SSIMPLE Model #### Multi-Path Disk Device Properties dialog box, click the MPIO tab, click Details in the DSM Name section, and then verify that the parameters are set to the default parameters.
Adding users to the local admin group in PowerShell
This article covers how to add users to local admin group either via Group Policy Objective or directly via command line.
To add a user to the local group in PowerShell:
You can add AD groups or users to the local admin group using the below Powershell command.
Add-LocalGroupMember -Group "Administrators" -Member "domain\user or group," "additional users or groups."
To add a user to the local admin group:
1. Right-click the newly created Group, select Properties, navigate to the Members tab, click Add… and enter designated users to the group, e.g. domain\administrator, domain\domain admins, domain\syskitmonitorservice.
2. Add other users that also need administrative privileges, if necessary.
3. Click OK to proceed.
To get local admin group members in PowerShell:
To get the local Administrators group members using PowerShell, you need to use the GetLocalGroupMember command.
This command is available in PowerShell version 5.1 onwards and the module for it is Microsoft. PowerShell. LocalAccounts.
To Create a User Account in Windows 10 with PowerShell:
1. Open PowerShell as Administrator.
2. To create a new user account without a password, type New-LocalUser -Name "user_name" -Description "Description of your new account." -NoPassword .
3. To create a user account that has a password, firstly execute the following line: $Password = Read-Host -AsSecureString .

Install Azure PowerShell module
This article will guide you on how to install the Azure PowerShell module using the cmdlets method and through offline.
Azure CLI is available on #Windows, Mac, Linux, etc. Azure cloud shell is another option that can be browser-accessible and authenticated.
Azure cloud shell gives you options to choose from either bash or Powershell.
The Get-Command cmdlet gets all #commands that are installed on the computer, including cmdlets, aliases, functions, filters, scripts, and applications.
Get-Command gets the commands from #PowerShell modules and commands that were imported from other sessions.
We can use Windows Powershell for managing Azure resources by installing az module.
To install the Azure PowerShell #module, run the following command. Make sure that the Windows PowerShell ISE is opened in "run as administrator” mode.
By default, the PowerShell gallery is not configured as a Trusted repository for PowerShellGet.
Click on “Yes to All” to continue with the installation.
Modules included in Azure PowerShell:
1. Azure PowerShell Az. Automation.
2. Azure PowerShell AzureRM. Automation.
3. Other PowerShell modules.
4. Internal Orchestrator. AssetManagement. Cmdlets module.
5. Python 2 modules.
6. Custom modules that you create.


