Tips to secure mail server
This article covers some tips to secure a mail server.
Email on the internet is sent by the Simple Mail Transfer Protocol (SMTP). Where a mail flow between servers is not encrypted, it could be intercepted by an ISP or government agency and the contents can be read by passive monitoring.
Basically, When emails are sent between two parties, unless BOTH parties use encryption the message is open and can be read by anyone who intercepts it.
Any emails sent to and received from mailboxes that only send cleartext emails should be considered as security liabilities.
Tips on how to secure your mail server:
1. Encryption: When securing your mail server, make sure you are using secure connections. Encrypt POP3 and IMAP authentication and use SSL and TLS.
2. Mail relay configuration: Avoid being an open relay for spammers by specifying which domains/IP addresses your mail server will relay mail for.
3. Connections and default settings: To avoid DoS attacks, limit the number of connection and authentication errors that your systems will accept. Remove unneeded server functionality by disabling any unnecessary default settings. Have a dedicated mail server and move other services like FTP to other servers. Keep total, simultaneous, and maximum connections to your SMTP server limited.
4. Access Control: To protect your server from unauthorized access, implement authentication and access control. For example, SMTP authentication requires users to supply a username and password to be able to send mail from the server. Make sure access to your servers is on a need-to-have basis and is shared with as few people as possible.
5. Abuse prevention: Check DNS-based blacklists (DNSBLs) and reject email from any domains or IPs listed on them. Check Spam URI Real-time Blocklists (SURBL), and reject any messages containing invalid or malicious links.
Also, maintain a local blacklist and block any IP addresses that specifically target you. Employ outbound filtering and use CAPTCHA/reCAPTCHA with your web forms.
Ansible error Shared connection to server closed
This article covers the Shared connection to server closed error which occur when we run an Ansible command to execute commands on two newly deployed CentOS 8 servers.
Ansible is an open-source automation tool, or platform, used for IT tasks such as configuration management, application deployment, intraservice orchestration, and provisioning.
While you can write Ansible modules in any language, most Ansible modules are written in Python, including the ones central to letting Ansible work. By default, Ansible assumes it can find a /usr/bin/python on your remote system that is either Python2, version 2.6 or higher or Python3, 3.5 or higher.
A quick fix to Ansible error Shared connection to server closed is to just add the path to python 3 in your inventory file.
It would look something like this:
ip_address ansible_python_interpreter=/usr/bin/python3
Then you could test if it works with the ping module:
ansible -m ping all
From the error details, the connection failed because the shell(s) in the remote system couldn't find the Python interpreter (/usr/bin/python) as indicated by the line: "module_stdout": "/bin/sh: /usr/bin/python: No such file or directory\r\n".
After checking the remote hosts, we discovered that the systems don't have Python 2 installed.
Check Python Binary
They have Python 3 installed by default and its binary is /usr/bin/python3.
According to the Ansible documentation, Ansible (2.5 and above) works with Python version 3 and above only.
Also, Ansible is supposed to automatically detect and use Python 3 on many platforms that ship with it.
However, if it fails to, then you can explicitly configure a Python 3 interpreter by setting the ansible_python_interpreter inventory variable at a group or host level to the location of a Python 3 interpreter.
Manage Networking with NetworkManager in RHEL CentOS 8
This article covers NetworkManager daemon for managing the networking service to dynamically configure and control network devices and keep connections up and active when they are available.
Netstat is a command line utility that can be used to list out all the network (socket) connections on a system.
It lists out all the tcp, udp socket connections and the unix socket connections.
To reboot Linux using the command line: To reboot the Linux system from a terminal session, sign in or “su”/”sudo” to the “root” account.
Then type “ sudo reboot ” to reboot the box. Wait for some time and the Linux server will reboot itself.
To troubleshoot network connectivity with Linux server:
i. Check your network configuration.
ii. Check the network configuration file.
iii. Check the servers DNS records.
iv. Test the connection both ways.
v. Find out where the connection fails.
vi. Firewall settings.
vii. Check Host status information.
To change the hostname in Linux Ubuntu:
i. Type the following command to edit /etc/hostname using nano or vi text editor: sudo nano /etc/hostname. Delete the old name and setup new name.
ii. Next Edit the /etc/hosts file: sudo nano /etc/hosts.
iii. Reboot the system to changes take effect: sudo reboot.
To reinstall #network service in #Linux (#Ubuntu / #Debian):
i. Use the following command to restart the server networking service. # sudo /etc/init.d/networking restart or
# sudo /etc/init.d/networking stop # sudo /etc/init.d/networking start else # sudo systemctl restart networking.
ii. Once this done, use the following command to check the server network status.
Django Application with Kubernetes
This article covers deploying a Scalable and Secure Django Application. Kubernetes is a powerful open-source container orchestrator.
Kubernetes is a powerful open-source container orchestrator that automates the deployment, scaling and management of containerized applications.
Kubernetes objects like ConfigMaps and Secrets allow you to centralize and decouple configuration from your containers, while controllers like Deployments automatically restart failed containers and enable quick scaling of container replicas.
TLS encryption is enabled with an Ingress object and the ingress-nginx open-source Ingress Controller.
The cert-manager Kubernetes add-on renews and issues certificates using the free Let’s Encrypt certificate authority.
HTTP Client in Node js
This article covers how to create HTTP Client in Node.js. Here, we performed GET, POST, PUT, and DELETE requests in Node.js. Node HTTP tutorial shows how to create HTTP server and client applications in JavaScript with HTTP module.
HTTP is a Node.js module which can be used to create HTTP server and client applications in JavaScript.
Node.js comes bundled with an http and an https module. These modules have functions to create an HTTP server so that a Node.js program can respond to HTTP requests. They can also make HTTP requests to other servers.
Popular JavaScript frameworks including Express and HapiJS are built on top of the HTTP module.
To Set up HTTP:
1. First, we install the HTTP module.
$ node -v
$ npm init -y
2. We initiate a new Node.js application.
$ npm i http
3. We install HTTP with npm i http command.
KVM live migration to resolve performance issues
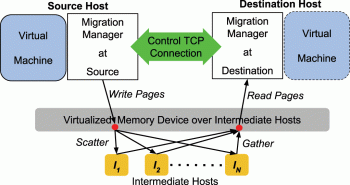
This article covers how to use KVM live migration to achieve load balancing which is important in a server virtualization system to maintain server performance.
Migration enables an administrator to move a virtual machine instance from one compute host to another. A typical scenario is planned maintenance on the source host, but migration can also be useful to redistribute the load when many VM instances are running on a specific physical machine.
Kernel-based Virtual Machine (KVM) is an open source virtualization technology built into Linux.
Specifically, KVM lets you turn #Linux into a #hypervisor that allows a host machine to run multiple, isolated virtual environments called guests or virtual machines (VMs).
Live migration of virtual machines is necessary when you need to achieve high-availability setups and load distribution.
The #KVM hypervisor has been a powerful alternative to Xen and VMware in the Linux world for several years.
To make the virtualization solution suitable for enterprise use, the developers are continually integrating new and useful features.
An example of this is live migration of virtual machines (VMs).
Live #migration involves:
The instance keeps running throughout the migration.
This is useful when it is not possible or desirable to stop the application running on the instance.
Live migrations can be classified further by the way they treat instance storage:
1. Shared storage-based live migration. The instance has ephemeral disks that are located on storage shared between the source and destination hosts.
2. Block live migration, or simply block migration. The instance has ephemeral disks that are not shared between the source and destination hosts. Block migration is incompatible with read-only devices such as CD-ROMs and Configuration Drive (config_drive).
3. Volume-backed live migration. Instances use volumes rather than ephemeral disks.
Block live migration requires copying disks from the source to the destination host.
It takes more time and puts more load on the network. Shared-storage and volume-backed live migration does not copy disks.


