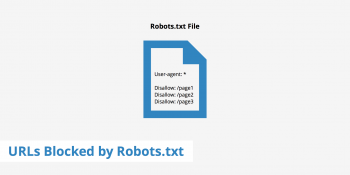
Sitemap blocked by robots txt
This article will guide you on tips to resolve sitemap blocked by robots.txt which is generally caused due to developers improperly configuring the robots.txt file.
A #sitemap is a blueprint of your website that help search engines find, crawl and index all of your website's content. #Sitemaps also tell search engines which pages on your site are most important.
A sitemap is vital for good SEO practices, and #SEO is vital in bringing in traffic and revenue to the website.
On the flip side, sitemaps are essential to having search engines crawl and index the website so that the content within it can be ranked within the search results.
txt file is usually the first place crawlers visit when accessing a website. Even if you want all robots to have access to every page on your website, it's still good practice to add a robots. txt file that allows this. txt files should also include the location of another very important file: the #XML Sitemap.
Crawl-delay in robots. txt.:
The Crawl-delay directive is an unofficial directive used to prevent overloading servers with too many requests.
If search engines are able to overload a server, adding Crawl-delay to your robots. txt file is only a temporary fix.
Install Minecraft Server on Ubuntu 20.04
This article will guide you on how to install a Minecraft server on #Ubuntu 20.04 and set up a daily backup. You can now launch the Minecraft client, connect to the server and start Minecraft adventure.
Setting up a #Minecraft server on #Linux (Ubuntu 12.04) is a fairly easy task on the command line.
Of the previously given ports, the only one I want you to memorize is 25565, because that is Minecraft's default port number. What we want to do is forward inbound traffic on port 25565 to our Minecraft server that's located on the private internal network.
Process of Setting up Minecraft Server on Ubuntu:
1. Create New Minecraft User. Add the new “minecraftuser” to the “sudo” group.
2. Add Minecraft User To Sudo Group.
3. Switch To Minecraft User.
4. Install wget Package.
5. Install Java OpenJDK package.
6. Check Installed Java Version.
7. Install Screen Package.
8. Create A Minecraft Directory.
To Install #Steam from Ubuntu package repository :
i. Confirm that the multiverse Ubuntu repository is enabled: $ sudo add-apt-repository multiverse $ sudo apt update.
ii. Install Steam package: $ sudo apt install steam.
iii. Use your desktop menu to start Steam or alternatively execute the following command: $ steam.

Cloudflare 404 Not Found error
This article will guide you on differerent methods to fix Cloudflare 404 Not Found #error which occurs when website content has been removed or moved to another URL.
There are also other reasons why an error message could appear.
The URL or its content (such as files or images) was either deleted or moved (without adjusting any internal links accordingly).
To fix #Cloudflare #404 error:
1. Retry the web page by pressing F5, clicking/tapping the refresh/reload button, or trying the URL from the address bar again.
2. Check for errors in the URL.
3. Move up one directory level at a time in the URL until you find something.
4. Search for the page from a popular search engine.
Important factors relating to 404 error:
i. A 404 not found error is an HTTP status code that means that the page you wanted to access a website couldn't be found on their server.
ii. Did you know that search engines, such as Google and Yahoo, will get a negative impression of a website if it has too many HTTP 404 errors?
iii. A 404 is an HTTP status code that means you're able to communicate with the server but the server can't find the specific page.
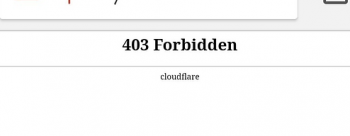
Cloudflare 403 forbidden error
This article will guide you in fixing Cloudflare 403 forbidden error. The Cloudflare error is caused by server end. The major reasons for this error are IP deny rules, #permissions rules, or browser #cache.
To fix Cloudflare #error?
Contact your site administrator or hosting provider to eliminate these common causes:
1. Ensure your origin web server is responsive.
2. Review origin web server error logs to identify web server application crashes or outages.
3. Confirm #Cloudflare IP addresses are not blocked or rate limited.
4. Allow all Cloudflare IP ranges in your origin web server's firewall or other security software.
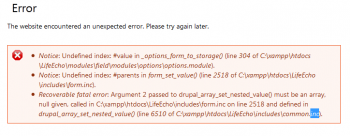
Drupal Unexpected Error
This article will guide you on how to fix #drupal unexpected error. Drupal error occurs due to many reasons that include corrupt #database, non-compatible modules installation, cache, #PHP configuration, custom codes, and so on.
1. An "Internal Server Error" is an #error on the web server that you're trying to access. 2. That server is misconfigured in some way that is preventing it from responding properly to what you're asking for.
3. An "Internal Server Error" often occurs due to: Misconfigured Drupal core file or folder read and write permissions.
To clear cache in #Drupal:
i. In the Manage administrative menu, navigate to Configuration > Development > Performance (admin/config/development/performance).
ii. Click Clear all caches.
iii. A message saying the cache has been cleared appears at the top of the page.
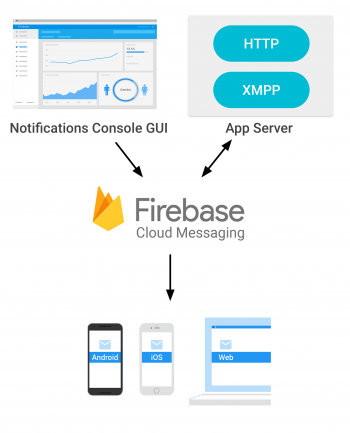
Push Notification using Firebase Cloud Messaging
This article will guide you on steps to set up push notifications. Also, you will learn how to set up push notification using Firebase.
#Firebase #Notifications is a free service that enables user notifications for Android and iOS devices. These notifications can be directed at your individual users; to topics that they subscribe to; or to segments defined by analytics audiences.
Notification messages are handled by the FCM SDK automatically and displays the message to end-user devices on behalf of the client app. Notification messages have a predefined set of user-visible keys and an optional data payload of custom key-value pairs.
To the end user, push notifications may not seem noticeably different from marketing communications via SMS or email.
However, from a mobile app's end, push notifications are an enormous improvement in terms of reliability and sophistication to SMS.
To check my firebase push notifications:
1. #Install and run the app on the target device.
2. Make sure the app is in the background on the device.
3. Open the Notifications composer and select New notification.
4. Enter the message text.
5. Select Send test message.


