Install SSL Certificate in IIS 7
This article will guide you on steps to #install SSL Certificate in IIS 7 #windows 2008 server.
IIS (Internet Information Services) is used to host ASP.NET web applications and static #websites. It can also be used as an #FTP server, host WCF services, and be extended to host #web #applications built on other platforms such as #PHP. There are built-in authentication options such as Basic, ASP.NET, and Windows auth.
To install a certificate in Windows Server:
i. In the left pane of the console, double-click #Certificates (Local Computer).
ii. Right-click Personal, point to All Tasks, and then select Import.
iii. On the Welcome to the Certificate Import Wizard page, select Next.
iv. On the File to Import page, select Browse, locate your certificate file, and then select Next.
To enable SSL in IIS:
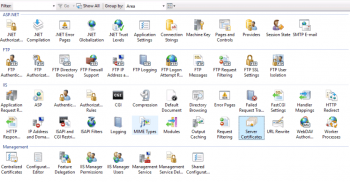
1. On the #IIS server, start the IIS Manager (on the Windows taskbar, select Start > Administrative Tools > Internet Information Services (IIS) Manager).
2. Enabling SSL in IIS
3. In Type, select https.
4. In SSL certificate, select an appropriate certificate from available choices.
5. Click OK.
Install Vesta control panel in Ubuntu
This article will guide you on easy steps to install Vesta control panel in #Ubuntu. VestaCP is a control panel for Linux with many features that facilitate the administration of a #server.
Vesta Development team provides an installer script that automates setting up of Vesta hosting control panel on Ubuntu / Debian and RHEL based Linux distributions. Login to your Ubuntu / #Debian system and ensure the system is updated. Download #Vesta installer. Run install with sudo if you're logged in as standard user.
To install vestaCP on Ubuntu:
1. # Connect to your server as root via #SSH
ssh root@your.server
2. # Download installation script
curl -O http://vestacp.com/pub/vst-install.sh
3. # Run it
bash vst-install.sh
To change my VestaCP port:
i. conf file and change the port that NGINX listens on from 8083 to 2083 (or the port you chose to use). listen 2083;
ii. Once the port has been changed, press CTRL+X , followed by y , and then hit enter to save your changes.
iii. The final step is removing the firewall entry for the previous port we were using.
Packet Drop On bond0
This article will help to fix packet drop on bond0. Here, you will learn more about packet loss.
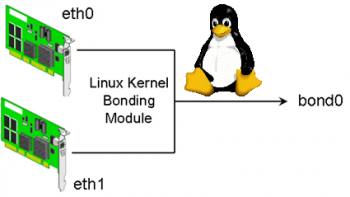
In Linux, in order to connect more than one network interfaces into a single interface, a special kernel module named bonding is used.
Here, two or more network interfaces can be connected into a single logical “bonded” interface.
Digitally Signed Files with PowerShell
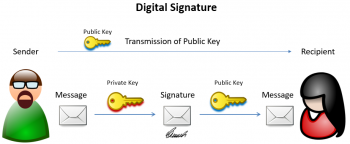
This article will guide you on how to implement reporting on digitally signed files with PowerShell.
Get-Command gets the commands from PowerShell modules and commands that were imported from other sessions.
To get only commands that have been imported into the current session, use the ListImported parameter.
Without parameters, Get-Command gets all of the cmdlets, functions, and aliases installed on the computer.
Shorewall forward reject How to resolve this error
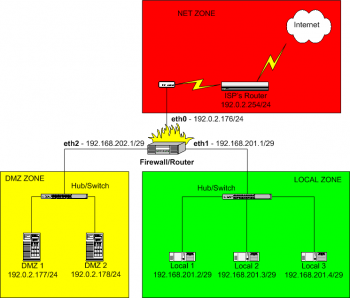
The 'Shorewall forward reject' error mainly occurs when there is any misconfiguration or missing in the rules added to the Shorewall configuration files.
Shorewall rules file:
Entries in this file govern connection establishment by defining exceptions to the policies laid out in shorewall-policy(5). By default, subsequent requests and responses are automatically allowed using connection tracking.
Install a module in DNN
This article will guide you on how to #install a module in #DNN.
To Install / Update a #DotNetNuke #Module:
1. Log into your site as either HOST or another supersuser level account.
2. Open Settings -> Extensions.
3. Click "install extension".
4. Drag and drop the package into the window, or browse to the desired file to upload it.
5. Click Next, accept the license, continue through the install. When finished click on the Return button.
